How Far Apart Should Bollard Lights Be Spaced Along Pathways
 FACEBOOK
 TWITTER
 LINKEDIN
Determining the correct lighting spacing for your outdoor walkway is a critical step in balancing functional safety with a welcoming atmosphere. This decision isn’t just about how many fixtures you can afford; it’s about achieving uniform illumination so that the transition from one pool of light to the next is seamless. When you plan your layout, your primary goal is to support pathway safety by eliminating “black holes” where tripping hazards might hide. At the same time, you must prioritize visual comfort, ensuring that the light guides your guests’ footsteps without creating a blinding or industrial feel.
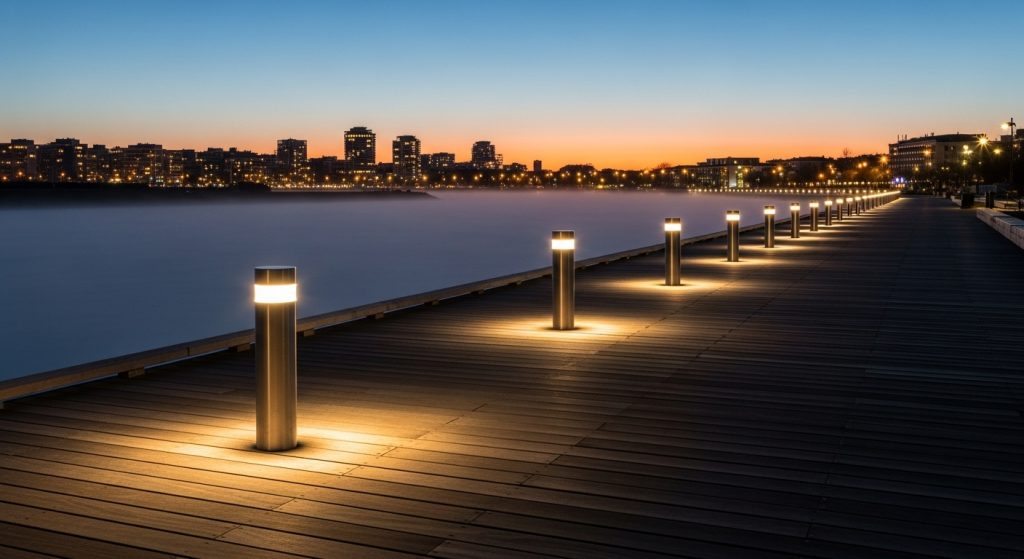
The logic behind your spacing depends on several variables, including the width of your path and the specific performance of your chosen hardware. A narrow garden trail requires a different approach than a broad commercial promenade. By looking at the “throw” of the light and the height of the fixture, you can calculate a distance that keeps the path consistently bright. Proper spacing creates a rhythm of light that feels natural and intentional. Whether you are aiming for a soft, decorative glow or high-visibility security, a well-calculated plan ensures that your outdoor space remains navigable and attractive throughout the night.
Why bollard light spacing influences pathway safety and comfort
The way you arrange your fixtures directly impacts the visual continuity of your landscape. If your spacing is too wide, your eyes have to constantly adjust between bright spots and total darkness, which can be disorienting. Achieving uniform coverage ensures that the entire walking surface is visible at a glance, allowing for much more safe navigation. This is particularly important for areas with uneven ground, gravel, or nearby water features where a single misstep could lead to an accident.
Human perception plays a massive role here as well. We feel more secure when we can see the path several steps ahead. When light is spaced evenly, it creates a “guiding” effect that makes a dark yard feel open and approachable. By avoiding the high contrast of isolated “hot spots,” you maintain a high level of comfort for the eyes. This thoughtful arrangement turns a simple path into a professional landscape feature, providing the security you need while preserving the peaceful, nighttime character of your property.
What pathway width and fixture height tell you about spacing
Your pathway width is one of the most practical starting points for your layout. A narrow two-foot path can be lit from one side with relatively tight spacing. However, if you are lighting a wide driveway or a five-foot stone walkway, you may need to stagger the lights on both sides or choose fixtures with a much wider light throw. The goal is to ensure the beam reaches all the way across the walking surface without fading into the shadows before it hits the other edge.
The fixture height acts as a lever for your coverage. Generally, a taller bollard (around 30 to 40 inches) will cast its light further than a shorter 12-inch “path light.” Because the light source is higher, the cone of illumination expands, allowing you to increase the distance between each post. When you match the height of the pole to the width of the path, you maximize the efficiency of each unit. This balance ensures that you aren’t using more fixtures than necessary while still guaranteeing that every inch of the walkway is clearly visible.
Typical spacing ranges for standard pathways and when to use them
While every project is unique, most spacing ranges follow established professional standards based on the usage context. For residential garden walkways where the mood should stay soft and intimate, spacing bollards every 6 to 8 feet is often ideal. This creates a gentle overlap that highlights nearby plants while keeping the path clear. In these settings, the focus is often as much on the lighting plan‘s beauty as it is on its utility.
In contrast, public walkways or high-traffic shared spaces usually require more intense coverage. For these areas, a distance of 4 to 6 feet might be necessary to ensure maximum visibility for a diverse range of users. If you are lighting a very long, straight path, you can sometimes push the spacing to 10 feet if you use high-output lamps. By varying the distance based on how the path is used—whether for a quick dash to the car or a slow stroll through the garden—you ensure the brightness matches the activity level of the space.
How light output and diffusion shape spacing decisions
The raw light output, measured in lumens, is the “engine” that determines how far apart your lights can go. A fixture with 300 lumens will naturally cover more ground than one with 100 lumens. However, you must also look at the diffusion pattern. Some bollards use frosted lenses or internal reflectors to spread the light softly in all directions, while others are “shielded” to push a sharp beam specifically onto the ground.
A good coverage balance is achieved when the light doesn’t just reach the next pole but does so with a soft transition. If your fixtures have a sharp, narrow beam, you will need to place them closer together to avoid dark gaps. If they have a wide, diffused glow, you have more freedom to spread them out. Choosing bulbs and covers that match your desired spacing helps you avoid “spotty” lighting, ensuring that the path feels like a continuous ribbon of light rather than a series of disconnected glowing points.
How spacing interacts with fixture style and design language
Your fixture style dictates more than just looks; it influences how the light is “sculpted” on the ground. For example, a geometric design might cast light in a crisp, square pattern, while a perforated fixture creates an intricate, textured glow. These patterns can look messy if they overlap too much, or confusing if they are too far apart. You should choose your spacing to maintain a consistent visual rhythm that complements the lines of your home and landscape.
Maintaining design harmony means ensuring that the physical presence of the bollards doesn’t clutter the view during the day. If you have a minimalist garden, using fewer, more powerful lights spaced further apart keeps the look clean. If your garden is lush and detailed, more frequent, shorter bollards can help define the smaller “rooms” of the landscape. By syncing the distance between your lights with the artistic form of the fixtures, you ensure that the system looks as professional in the sunlight as it does when it’s glowing at night.
Adjusting spacing for environmental conditions and obstacles
No yard is a perfectly flat, empty line, so you must be ready for site adaptation. Obstacles like large trees, benches, or architectural features will often break your perfect spacing. You should use these features as anchors; place a light near a bench for safety or behind a shrub to create a beautiful silhouette. Obstacle adaptation is the difference between a generic “runway” look and a custom, high-end design that respects the geography of your land.
Lighting consistency is especially tricky on sloped ground or stairs. When a path goes uphill, the “throw” of the light changes, often requiring you to bring the bollards closer together to maintain safety. On a curve, you should always place a light at the apex to guide the eye and show the direction of the turn. By adjusting your spacing plan to account for the unique terrain and features of your property, you create a system that feels intuitive and specifically built for your life.
What common spacing errors reduce lighting effectiveness
The most frequent spacing errors involve placing bollards too far apart, which leaves dangerous “black holes” along the route. This is often a result of trying to save on costs, but it ultimately compromises the safety of the entire project. Another common blunder is a design mismatch where lights are placed too close together, causing excessive glare and a “runway” effect that can feel cold and industrial.
Planners also sometimes ignore the performance issues caused by inconsistent heights. If you mix tall and short bollards without a clear plan, the light levels will be uneven and confusing to the eye. Using high-output lights in a small, enclosed space is another mistake that ruins the visual comfort of a garden. To avoid these blunders, you should always conduct a “night test” with a flashlight or temporary lights to see exactly how the shadows fall before you commit to permanent installation.
Checklist for spacing bollard lights before installation
Before you start digging, a thorough pre-installation review is necessary to ensure your installation readiness. This final check allows you to visualize the outcome and make minor adjustments that save time and money. By following a structured spacing plan, you ensure that your property stays bright, safe, and beautiful for years.
- Measure the path: What is the total length and pathway width?
- Identify activity: Is this a high-traffic entrance or a quiet garden trail?
- Select hardware: What is the fixture height and lumen light output?
- Map the “throw”: How far does the beam reach before it fades?
- Identify obstacles: Where are the trees, curves, and steps located?
- Create a diagram: Draw a baseline spacing map (e.g., every 6 feet).
- Adjust for features: Move lights to highlight focal points or cover dark corners.
- Final walk-through: Visualize the sightlines from your windows and patio.
Lawn bollard pathway lighting means in outdoor design
Lawn bollard pathway lighting refers to the specific use of vertical post fixtures to provide walkway illumination. These bollard fixtures are the primary choice for defining the edges of your grass and keeping your paths safe. They serve as the functional anchor of your design, ensuring that your most important routes are always visible.
Why outdoor waterproof lawn lights matter for spacing durability
Choosing Outdoor waterproof lawn lights ensures that your spacing remains consistent for the long haul. High weather durability and IP protection prevent moisture from damaging the internal LEDs. If a fixture fails due to rain, it leaves a “dark gap” that ruins your entire lighting rhythm, making waterproof construction a non-negotiable for safety.
How geometric outdoor lawn lights influence spacing decisions
A Geometric outdoor lawn light uses a sharp geometric design that dictates its light distribution. These fixtures often have a more structured, directed beam than round bollards. When you choose geometric styles, you must adjust your spacing to match the crisp “footprint” of the light, ensuring that the patterns align beautifully with your path’s edges.
Why IP ratings should be reviewed when placing lawn bollard lights
A Lawn lights IP rating guide explains the level of protection against outdoor exposure. When you plan your spacing, you must ensure that your hardware can handle being placed near irrigation heads or in low-lying areas where water might pool. A high IP rating is your guarantee that the lights will continue to glow through every storm.
How lawn light materials influence spacing and installation quality
The Lawn light materials guide explains why material durability is vital for installation ease. High-quality aluminum or stainless steel posts stay perfectly vertical over time, ensuring that your lighting spacing remains exact. Choosing the right material prevents the “leaning” effect that can make even a perfectly spaced path look messy and neglected.


- 10 Meters Lamp Post
- 10 Meters Pole
- 1000w Led Projector
- 100W LED Tunnel Light
- 12 Meters Lamp Post
- 12 Meters Pole
- 1200w Led Projector
- 15 Light Pole
- 1500w Led Projector
- 150W LED Tunnel Light
- 1800w Led Projector
- 2 In 1 Solar Flood Light
- 200w Led Tunnel Light
- 50w Led Tunnel Light
- 6 Meters Lamp Post
- 6 Meters Pole
- 8 Meters Lamp Post
- 8 Meters Pole
- 800w Led Projector
- 80w Led Tunnel Light
- Colourful Decorative Light
- Conical post
- Courtyard Lamp
- courtyard light
- courtyard lighting fixture
- Decorative Landscape Light
- Decorative road Light
- Flood Light For Courtyard
- Flood Light for Garden
- Flood Light For Outdoor
- Foot Led High Bay Lights
- high bay led lights 100w
- industrial lampshade
- industrial LED shed lights
- industrial magnifying glass with light
- Integrated Solar Flood Light
- led courtyard lamp
- led courtyard light
- led high bay light 100w
- LED Projector For Stadium
- Led UFO High Bay 150W 5000k
- Lighting Plants Mining Price
- Maintenance Free LED Street Light
- Pic Controlling Tunnel Light
- PLC controlling tunnel light
- Post Top Garden Light
- RGB Landscape Light
- Rgbw Decorative Light
- Smart Tunnel Light
- solar courtyard lamp
- solar courtyard light
- Solar LED Road Light
- Solar Street Light For 10 Meter Pole
- Solar Street Light For 12 Meter Pole
- Solar Street Light For 6 Meter Pole
- Solar Street Light For 8 Meter Pole
- Split Type Solar Flood Light
- Sporting Projector
- Stadium Led Projector
- Street Lighting Post