How can solar bollard lights be installed without wiring in outdoor spaces
 FACEBOOK
 TWITTER
 LINKEDIN
A solar installation offers a revolutionary approach to landscape design by providing a completely wire-free lighting solution. Unlike traditional systems that require high-voltage cables, solar bollards are self-contained power plants. They utilize integrated photovoltaic cells to harvest energy during the day, which is then stored for use after dark.
This independence from the electrical grid means you can bypass the labor-intensive and expensive process of trenching through your lawn or hiring a licensed electrician. For homeowners and planners, this translates to an outdoor placement strategy that is limited only by the availability of natural light, rather than the location of the nearest power outlet.
Successful implementation relies on thoughtful site preparation and an understanding of how these fixtures interact with the environment. Because there are no physical wires to connect the lights, the “wiring” is replaced by a wireless relationship with the sun. You must analyze your yard’s unique geography to ensure each post is positioned to thrive.
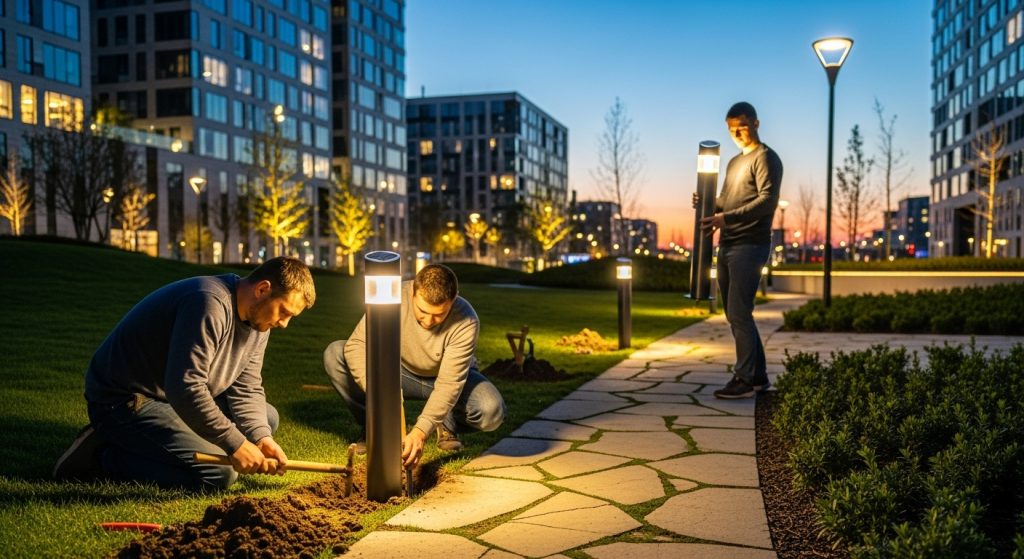
Proper layout planning ensures that the lack of cables does not lead to haphazard placement, but instead results in a professional, high-performance lighting scheme. By focusing on sunlight access and ground stability before you begin, you ensure that your wire-free setup provides the same level of safety and beauty as any hardwired alternative.
Why solar bollard lights do not require electrical wiring
The ability to operate as off-grid lighting stems from a compact, three-part system housed within each fixture. Every bollard features a top-mounted solar panel that converts photons into DC electricity. This power is directed into an internal battery storage unit, which holds the charge until a built-in sensor detects sunset. Because each light generates its own fuel, there is no need for a central transformer or buried copper lines to move power from the house to the garden.
This structural independence is the primary advantage over traditional wired landscape lighting. In a wired system, every light is a slave to the circuit; if a wire is cut by a shovel, the entire line goes dark. Solar bollards function as autonomous units, meaning a problem with one fixture never affects the performance of its neighbors. This modular nature makes them incredibly resilient and simplifies the long-term management of your outdoor lighting, as you never have to troubleshoot complex underground electrical faults.
What site conditions must be checked before installing solar bollard lights
Before you commit to a specific location, a thorough review of site conditions is essential to prevent future performance issues. The most critical factor is sun exposure. You must observe how shadows from your home, fences, and nearby trees move throughout the day. A spot that looks bright at noon might be in total darkness by 2:00 PM, which will significantly reduce the light’s ability to stay on through the night.
Ground preparation and stability are equally important. Since bollards are vertical posts, they require a firm foundation to remain upright over time. You should check the soil type; loose, sandy soil may require a small concrete base or a longer mounting spike than firm clay. Additionally, check for nearby irrigation heads or low-lying areas where water pools. While high-quality solar lights are weather-resistant, consistent submersion can damage the seals and compromise the internal electronics. By assessing these environmental factors first, you guarantee a secure and durable installation.
How placement affects charging and nighttime performance
Your placement strategy is the “programming” for your solar system. To maximize charging efficiency, the solar panels should ideally have an unobstructed view of the sky, especially during the peak sun hours of 10:00 AM to 4:00 PM. Orientation also plays a role; in the northern hemisphere, facing panels toward the south generally yields the highest energy harvest. Avoiding shaded zones is non-negotiable for performance reliability, as even partial shade can drop a panel’s output by more than 50%.
Beyond charging, you must align the lights with the actual flow of your landscape. If you are lighting a path, the bollards should be placed slightly back from the edge of the walkway to prevent them from being hit by lawnmowers or feet, while still being close enough to cast their glow across the walking surface. Strategic positioning ensures that the light goes where it is needed most for safety. When you match the light’s physical location with its energy needs, you create a system that stays bright and dependable from dusk until dawn.
How spacing should be planned before installation
Even without the constraint of wires, fixture spacing remains the most important factor for achieving uniform illumination. If you place your bollards too far apart, you will create “black holes” along the path that hide tripping hazards and disorient walkers. If they are too close together, the yard can look cluttered and over-illuminated. A professional layout planning approach involves measuring the total length of the area and dividing it by the “throw” of your specific fixtures.
Typical spacing for residential paths ranges from 6 to 10 feet, depending on the height of the bollard and the brightness of the LED. Taller fixtures usually have a wider light footprint, allowing you to spread them out further. The goal is to have the edges of the light pools overlap slightly to ensure a continuous ribbon of light. By mapping this out on paper or with temporary markers before the final mount, you can visualize the result and make adjustments to ensure every corner of your path is safe and well-lit.
How brightness expectations should guide installation decisions
When planning your light output, it is vital to match the hardware to the safety needs of the area. Solar bollards generally provide a soft, ambient glow rather than the high-intensity beam of a stadium floodlight. For most brightness planning goals, you are looking for enough light to see the texture of the ground and identify obstacles. This level of output is perfect for creating visual comfort and a relaxing garden atmosphere.
If you have an area that requires high-security lighting—such as a steep set of stairs or a dark driveway gate—you may need to install more fixtures at tighter intervals to compensate for the lower individual lumen counts of solar units. Avoiding unrealistic expectations is key; solar lights are designed to be “always-on” guides rather than on-demand spotlights. By selecting fixtures with the right lumen rating for your specific use case, you ensure that the final installation provides the clarity and security you expect for your home.
What installation mistakes reduce performance of wire-free solar bollards
One of the most frequent installation errors is placing panels directly under eaves or dense tree canopies. Even if the area feels “bright” to you, the lack of direct UV rays will lead to performance loss, causing the lights to dim prematurely or fail to turn on at all during winter months. Another common blunder is poor layout planning that ignores the walking path. If the bollards are placed too far into the grass, they won’t illuminate the walkway effectively, leaving the very surface you need to see in shadow.
Planning mistakes also include ignoring the local climate. If you live in an area with high snow accumulation, placing short bollards can lead to them being buried and unable to charge. Furthermore, failing to clean the panels after installation can cause dust or pollen buildup, which acts like a shade cloth and kills efficiency. Avoiding these blunders requires a proactive approach: place your lights in the sun, keep them away from obstructions, and maintain them as part of your regular garden routine.
What checklist should be reviewed before final placement
Before you perform the final mounting of your fixtures, a thorough site readiness review will save you time and frustration. This installation checklist ensures that all technical and aesthetic requirements are met before the ground is disturbed. By conducting a final review, you can confirm that your garden will be safe and beautiful from the first night.
- Sunlight Mapping: Does each spot get at least 6 hours of direct, unobstructed sun?
- Path Alignment: Are the bollards positioned to light the actual walking surface?
- Spacing Check: Have you confirmed the distance between fixtures for uniform illumination?
- Ground Check: Is the soil firm enough to hold the posts vertical and level?
- Brightness Match: Does the light output meet the safety needs of that specific zone?
- Mower Clearance: Are the lights placed safely away from lawn maintenance routes?
- Sightlines: Do the lights look good from your windows and patio seating?
Are lawn bollard pathway lighting systems used for wire-free outdoor layouts?
Lawn bollard pathway lighting refers to the general category of vertical bollard fixtures used to guide pedestrians. In a wire-free setup, these units provide the essential pathway lighting needed for safety and security. They define the boundaries of your yard while creating a welcoming, professional look that enhances your home’s curb appeal.
How solar spiral bollard lights simplify installation without cables
Choosing a Solar spiral bollard light adds a unique spiral design to your landscape. The solar integration in these modern fixtures allows for extremely fast placement because the panels are often built directly into the aesthetic frame. They are an ideal choice for decorative paths where you want to combine artistic flair with the ease of a cable-free setup.
Why spacing guides are important before installing solar bollard lights
Following a professional Bollard light spacing guide is the best way to ensure uniform coverage. A solid spacing strategy prevents dark gaps and ensures that your path remains a safe, continuous route. By planning your spacing before the actual installation, you can maximize the effectiveness of each solar fixture and achieve a professional result.
How brightness recommendations influence solar bollard installation planning
Reviewing Solar bollard lights brightness data helps you match the fixture to the safety needs of your space. Lumens planning is vital for wire-free lights because their energy budget is limited. Understanding the brightness levels of your chosen units ensures that you install enough fixtures to keep your walkways safe without wasting energy on excessive illumination.


- 10 Meters Lamp Post
- 10 Meters Pole
- 1000w Led Projector
- 100W LED Tunnel Light
- 12 Meters Lamp Post
- 12 Meters Pole
- 1200w Led Projector
- 15 Light Pole
- 1500w Led Projector
- 150W LED Tunnel Light
- 1800w Led Projector
- 2 In 1 Solar Flood Light
- 200w Led Tunnel Light
- 50w Led Tunnel Light
- 6 Meters Lamp Post
- 6 Meters Pole
- 8 Meters Lamp Post
- 8 Meters Pole
- 800w Led Projector
- 80w Led Tunnel Light
- Colourful Decorative Light
- Conical post
- Courtyard Lamp
- courtyard light
- courtyard lighting fixture
- Decorative Landscape Light
- Decorative road Light
- Flood Light For Courtyard
- Flood Light for Garden
- Flood Light For Outdoor
- Foot Led High Bay Lights
- high bay led lights 100w
- industrial lampshade
- industrial LED shed lights
- industrial magnifying glass with light
- Integrated Solar Flood Light
- led courtyard lamp
- led courtyard light
- led high bay light 100w
- LED Projector For Stadium
- Led UFO High Bay 150W 5000k
- Lighting Plants Mining Price
- Maintenance Free LED Street Light
- Pic Controlling Tunnel Light
- PLC controlling tunnel light
- Post Top Garden Light
- RGB Landscape Light
- Rgbw Decorative Light
- Smart Tunnel Light
- solar courtyard lamp
- solar courtyard light
- Solar LED Road Light
- Solar Street Light For 10 Meter Pole
- Solar Street Light For 12 Meter Pole
- Solar Street Light For 6 Meter Pole
- Solar Street Light For 8 Meter Pole
- Split Type Solar Flood Light
- Sporting Projector
- Stadium Led Projector
- Street Lighting Post