Lighting Pole Arm Bracket Sizing and Installation
 FACEBOOK
 TWITTER
 LINKEDIN
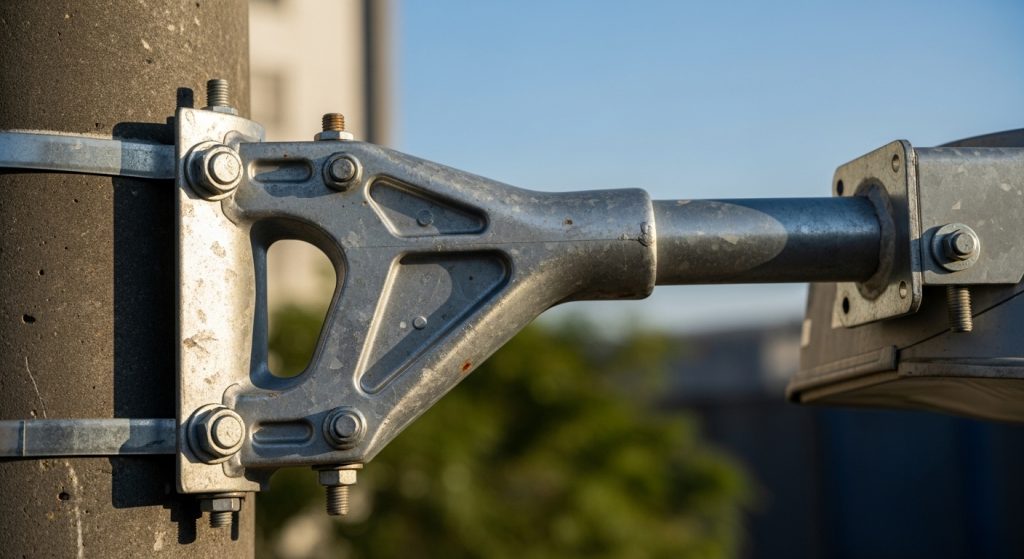
When you design a street lighting system, the arm brackets serve as the critical bridge between the vertical pole and the light fixture. These components are much more than simple fasteners; they are essential fixture support structures that bear the weight of the lamp while resisting constant environmental forces. If you treat bracket selection as an afterthought, you risk compromising the operational safety of the entire installation. A bracket that is too small for the intended load can sag or snap, while an incorrectly installed one can lead to uneven light distribution and hazardous road conditions.
Correct sizing and installation accuracy are just as important as the pole selection itself. Planners must calculate the structural load by considering the weight of the LED fixture, the length of the arm, and the local wind speeds. When these factors are balanced, you ensure the light stays perfectly aligned for its entire service life, reducing the need for emergency repairs and costly maintenance. By prioritizing high-quality bracket hardware and following precise installation protocols, you create a lighting setup that is both durable and dependable. This systematic approach ensures the physical mounting geometry supports the lighting goals of the project without introducing unnecessary risks to the public.
What role do arm brackets play in street lighting systems
Arm brackets serve as the primary structural connection between the light fixture and the pole. Their most important job is to facilitate a clean load transfer, moving the weight of the lamp and the leverage of the outreach arm directly into the pole vertical body. Without a robust bracket, the fixture would lack the stability needed to remain steady during storms or heavy traffic vibrations. These components ensure the lamp stays locked in a specific position, which is vital for maintaining consistent visibility on the road below.
Beyond providing strength, brackets are the key to perfect fixture alignment. They allow you to set the exact angle and orientation of the light, ensuring the beam hits the pavement rather than spilling into nearby yards or the sky. A high-quality bracket is designed to resist rotation and sagging over time, keeping your carefully planned lighting layout intact. When you select a bracket, you are choosing the component that ultimately dictates whether the light stays where you put it, making it a cornerstone of any safe street lighting system.
How does arm length affect lighting reach and structural stress
The arm length is the main factor that determines the light reach across a roadway. On wide multi-lane streets where poles must be set back from the curb, a longer arm is necessary to push the light source over the driving lanes. This extension helps you achieve better uniformity and visibility for motorists. However, you must realize every inch of arm length increases the leverage acting on the bracket and the pole. As the arm gets longer, the bending force at the mounting point grows significantly, putting more strain on the hardware.
Balancing this reach with the physical limits of your structure is a major part of the design process. A very long arm acts like a lever, magnifying the weight of the fixture and the pressure of the wind. If the arm is too long for the bracket rating, you will see visible sagging, which ruins the light aiming angle and can lead to metal fatigue. Planners must match the arm length to the bracket structural capacity to ensure the light reaches its target without compromising the safety of the entire assembly.
What factors determine the correct size of a lighting pole arm bracket
Determining the right bracket sizing starts with the fixture weight and the total surface area of the lamp. You need a bracket that can handle the vertical “dead load” of the light and the “wind sail” area it creates. If you are using a heavy, high-wattage LED fixture, the bracket must have thicker walls and stronger mounting plates to prevent deformation. You must also account for the mounting height; higher installations are often subjected to stronger, more consistent winds, requiring a more robust bracket size than a park-level pole.
Designers must also stay within the established design limits provided by the manufacturer. These limits take into account the combined stress of the arm reach and the fixture mass. You should also consider the “overhang” required to clear obstacles like trees or utility lines. By looking at these factors as an integrated set of data, you can choose a bracket size that provides a solid safety margin. This ensures the hardware will not just hold the light today, but will continue to do so through years of seasonal changes and extreme weather events.
Why material choice matters in arm bracket performance
The material strength of an arm bracket dictates how well it stands up to the constant pulling and pushing forces of the environment. Steel brackets are often specified for their high stiffness and ability to handle extreme loads without bending. However, they must be protected by hot-dip galvanization to ensure long-term corrosion resistance. Without this protection, rust can eat through the mounting points, creating a hidden danger that can lead to a fixture falling onto the road.
Aluminum brackets offer a lighter alternative that is naturally resistant to rust, making them ideal for coastal or high-humidity areas. While aluminum is easier to handle during the service life of the pole, it may lack the raw rigidity of steel for very long arm reaches. Choosing the right material involves matching the environmental threats of your site with the structural needs of the lighting plan. By prioritizing durable, high-quality metals, you reduce the frequency of inspections and replacements, making the lighting system more cost-effective over time.
How does pole geometry influence arm bracket selection
The pole geometry—whether the pole is straight, tapered, or multi-sided—dictates the type of mounting interface you need. For a straight pole, the bracket usually wraps around a uniform diameter, which makes for a straightforward connection. However, if you are working with a tapered pole, the bracket must be designed to fit a specific diameter at the mounting height, or it must be adjustable to ensure a tight, secure fit. A loose interface is a major failure point that leads to vibrations and eventual hardware damage.
You also have to consider the load balance across different pole shapes. Square poles provide a flat surface that makes mounting brackets easier and more stable, whereas round poles require curved backing plates to ensure the load is distributed evenly around the pole circumference. If you use the wrong bracket type for your pole shape, you risk localized stress that can cause the pole wall to “dimple” or the bracket to slip. Matching the bracket base to the pole geometry is the only way to ensure a rigid and permanent connection.
How should lighting pole arm brackets be installed correctly
A successful installation procedure begins with precise alignment control. Before you tighten any bolts, you must verify the arm is perfectly level and pointing in the correct direction according to the lighting plan. Even a slight tilt can throw the light beam off by several feet on the ground. Once the alignment is set, you must use fastening accuracy, which involves using a torque wrench to tighten bolts to the manufacturer’s exact specifications. Over-tightening can crush the pole wall, while under-tightening can allow the arm to rotate in the wind.
After the hardware is secured, a final inspection is mandatory. Technicians should check for any “play” in the bracket and ensure all lock washers or safety pins are in place. This is also the time to verify the internal wiring is not pinched between the bracket and the pole, which could cause a short circuit or fire later. By following a standardized checklist during installation, you eliminate common human errors that lead to premature hardware failure and ensure the lighting system is safe for the long haul.
How do wind loads impact arm bracket sizing and installation
Wind is the most unpredictable structural stress an arm bracket will face. When wind hits a fixture at the end of a long arm, it creates a massive amount of torque at the bracket. This is why wind load calculations are a non-negotiable part of the sizing process. The bracket must be rated to handle the peak gusts in your area without deforming. If the wind force exceeds the bracket strength, the arm can act like a lever that pries the bracket away from the pole.
To account for these forces, designers apply a safety factor, which typically requires the hardware to be several times stronger than the expected average load. During installation, you must ensure the mounting hardware is deep enough and strong enough to resist these shear forces. If you are in a high-wind zone, you might need to use double-bolted brackets or reinforced backing plates. By designing and installing for the worst-case weather scenario, you ensure the light stays securely in place no matter how hard the wind blows.
What mistakes commonly occur in pole arm bracket sizing and installation
One of the most frequent design mistakes is the “oversized arm” error, where a long arm is used on a bracket that was only rated for a short reach. This leads to immediate sagging and puts the entire structure at performance risk. You might also see installation errors where the wrong size of mounting hardware is used, or where the technician fails to use a torque wrench, leading to a connection that is either too loose or dangerously stressed.
Another common blunder is ignoring the mounting angle. If a bracket is installed at even a five-degree slant, the light distribution on the road will be uneven, creating dark spots that are dangerous for drivers. Poorly secured wiring inside the bracket is also a major risk, as it can lead to electrical failure or water ingress if the seals are not seated correctly. Avoiding these blunders requires a combination of clear technical specifications, the right tools, and a trained crew that understands the physical stakes of the job.
What checks should be completed before approving arm bracket installation
Before you finalize the project, an installation validation is necessary to ensure every bracket meets the required safety standards. This final check is your best defense against long-term maintenance issues and ensures structural reliability. You should never sign off on an installation without verifying the hardware matches the engineering drawings and that the mounting is secure.
Use this approval checklist to ensure the brackets are ready:
- Confirm the bracket size and material match the weight and reach of the fixture.
- Verify the arm is perfectly level and correctly aligned with the roadway lanes.
- Ensure all fasteners have been tightened to the correct torque specifications.
- Check that there is no visible sagging or deformation in the arm or bracket.
- Validate the mounting interface is compatible with the pole geometry.
- Confirm the wind load rating for the bracket is appropriate for the local climate.
- Ensure all internal wiring is protected and that weather seals are properly installed.
What specifications should street light poles and brackets meet together
When choosing hardware, you must prioritize bracket compatibility to ensure all parts adhere to international pole standards. The bracket must be designed to fit the specific tenon or wall thickness of the pole. If the pole and bracket are not perfectly matched, you will deal with vibrations that can loosen bolts and damage the fixture internal components over time. For more on how these parts work together, see our guide on Street light poles brackets.
How do straight light pole specifications affect arm bracket sizing
A straight pole design offers a consistent mounting surface, but it also has specific mounting limits. Because the diameter does not change, you must ensure the bracket is sized exactly for that dimension to avoid a loose fit. If you are mounting multiple arms on a single straight pole, you must also calculate the combined load to ensure you do not exceed the pole internal strength. Learn more about these requirements in the Straight light pole specs documentation.
How does aluminum vs steel pole material influence bracket selection
A material comparison is essential because different metals have a different load response. A steel bracket on a steel pole creates a very rigid connection, but you must use stainless steel or galvanized fasteners to prevent galvanic corrosion. If you are using aluminum poles, you should ideally use aluminum brackets to keep the weight down and prevent rust. Understanding how these materials interact is key to a long service life, as detailed in our guide on Aluminum vs steel light poles.
How does tapered pole design change arm bracket mounting requirements
Working with tapered geometry requires a specific mounting adaptation. Because the pole gets narrower toward the top, the bracket must be designed to fit the exact diameter at the height where it will be installed. If the bracket is meant for the base and you move it to the top, it will be too large and will not secure correctly. You can find more on managing these geometric challenges in the Tapered light pole explained overview.
Why wind load calculation is critical for arm bracket safety
A rigorous wind load analysis is the only way to ensure structural safety for an extended arm. The bracket acts as the pivot point for all the force caught by the light fixture. You must calculate the “EPA” (Effective Projected Area) of the lamp and use that to determine if the bracket can survive a major storm. Without this math, you risk a catastrophic failure during high winds. For details on how to perform these checks, see the Light pole wind load calculation guide.
Final Thought
Correctly sizing and installing lighting pole arm brackets is the difference between a lighting system that lasts for decades and one that becomes a constant safety risk. By focusing on the physics of load transfer, material strength, and precise alignment, you ensure your street lighting remains effective and secure. When the hardware is matched to the environment and installed with accuracy, the result is a safer, better-lit community.


- 10 Meters Lamp Post
- 10 Meters Pole
- 1000w Led Projector
- 100W LED Tunnel Light
- 12 Meters Lamp Post
- 12 Meters Pole
- 1200w Led Projector
- 15 Light Pole
- 1500w Led Projector
- 150W LED Tunnel Light
- 1800w Led Projector
- 2 In 1 Solar Flood Light
- 200w Led Tunnel Light
- 50w Led Tunnel Light
- 6 Meters Lamp Post
- 6 Meters Pole
- 8 Meters Lamp Post
- 8 Meters Pole
- 800w Led Projector
- 80w Led Tunnel Light
- Colourful Decorative Light
- Conical post
- Courtyard Lamp
- courtyard light
- courtyard lighting fixture
- Decorative Landscape Light
- Decorative road Light
- Flood Light For Courtyard
- Flood Light for Garden
- Flood Light For Outdoor
- Foot Led High Bay Lights
- high bay led lights 100w
- industrial lampshade
- industrial LED shed lights
- industrial magnifying glass with light
- Integrated Solar Flood Light
- led courtyard lamp
- led courtyard light
- led high bay light 100w
- LED Projector For Stadium
- Led UFO High Bay 150W 5000k
- Lighting Plants Mining Price
- Maintenance Free LED Street Light
- Pic Controlling Tunnel Light
- PLC controlling tunnel light
- Post Top Garden Light
- RGB Landscape Light
- Rgbw Decorative Light
- Smart Tunnel Light
- solar courtyard lamp
- solar courtyard light
- Solar LED Road Light
- Solar Street Light For 10 Meter Pole
- Solar Street Light For 12 Meter Pole
- Solar Street Light For 6 Meter Pole
- Solar Street Light For 8 Meter Pole
- Split Type Solar Flood Light
- Sporting Projector
- Stadium Led Projector
- Street Lighting Post