how do you install low voltage landscape lighting?
 FACEBOOK
 TWITTER
 LINKEDIN
You do not have to hire an electrician to design a beautiful outdoor area that is well-lit and does not have to cost a lot of money. Low voltage landscape lights are an easy DIY project and with the right tools and a basic plan, the entire task can be accomplished in a few hours and your house will appear a lot better, safer, and more enjoyable to look at at night.
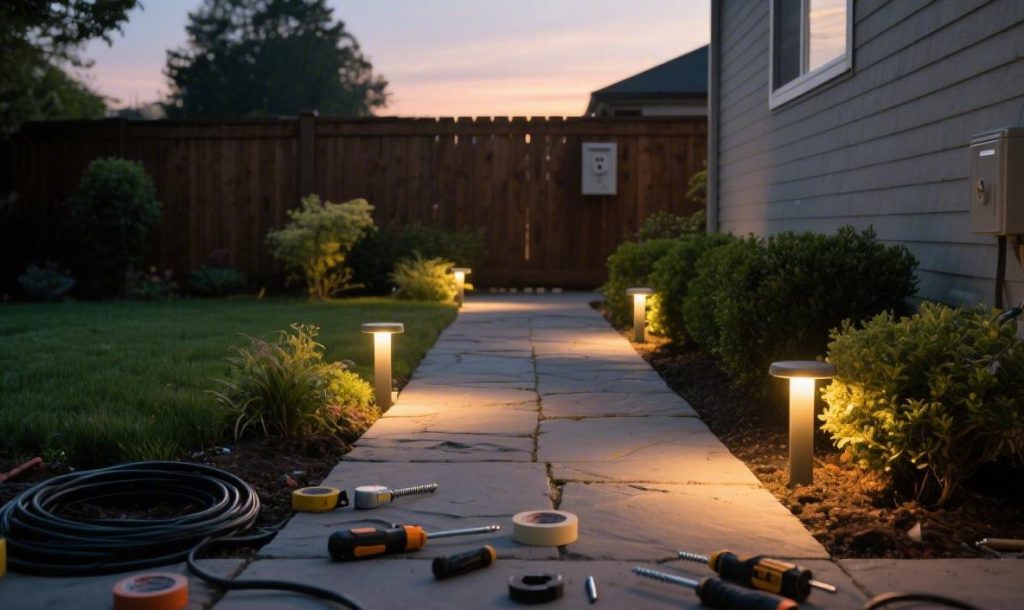
You can get proper advice in this guide on how to install low voltage landscape lighting step by step; planning, materials, wiring, and some tips that could help you achieve the best results.
What is Low Voltage Landscape Lighting?
Low voltage landscape lighting involves a transformer to cut regular household electricity (120 V) to a less hazardous 12 V system.
This kind of lighting is popularly applicable in the outdoor situations like:
- Garden pathways
- Driveways
- Plants and buildings.
- Patios and entryways
Key Benefits
- Easy to install and use (even outdoors)
- Power-efficient (particularly using LED lamps).
- DIY friendly, and do not require conduit in the majority of cases.
- Future upgradeable system.
Tools and Materials you will need.
Collect the necessary equipment:
- Low voltage transformer (12V)
- Landscape lighting (spotlights, path lights, floodlights).
- Low voltage cable (12/2 or 14/2)
- Waterproof connectors
- Wire strippers
- Electrical tape
- Raised bases or mounting equipment.
The selection of the appropriate transformer is important. Divide the sum of the wattage of all your lights and get a transformer that has at least 20 and 25 percent additional capacity so that you can get away with a voltage drop and room to grow.
Step 1: Design Your Lighting Plan.
The basis of a successful project is a good lighting plan.
Take a tour of your yard when it grows dark and point out the areas that require lighting:
- Pathways and walkways
- Entry points
- Landscape and trees.
- Architectural highlights
A typical beginning is to space lights 5-8 feet apart.
Pro Tip: Before installing fixtures, use the flashlight to pretend that it will have a lighting effect.
Step 2: Select the Appropriate Transformer.
The transformer will convert the power in your home to low voltage electricity.
How to size it:
- Add the total amount of wattage of all lights.
- Multiply by 1.25
- Select a transformer greater than that.
Example:
- The total lights (40W) divided by 1.25 = 50W transformer required.
To perform optimally, maintain your system at less than 80% of transformer capacity.
Step 3: Place the Lights.
Before wiring anything:
- You can put in each light where you please.
- Push posts shallowly in the ground.
- Modify position to achieve balance and coverage.
This assists you to see what it will end up being and prevent future errors.
Step 4: Run Low Voltage Cable.
Then lay your main cable (which is also known as the trunk line) along the intended line.
- 12/2 or 14/2 wire, depending on distance and wattage.
- Allow some spare time to make changes.
- No tight bends or tension.
A larger wire (lower gauge) decreases the voltage drop along long lines.
Step 5: Fit Transformer.
Mount the transformer:
- Next to a GFCI outdoor outlet.
- No less than 12 inches high.
- On a wall or post
Then:
- Peel off approximately 1/2 inch of insulation.
- Attach wires to terminals of transformers.
- Tighten screws securely
Low voltage systems do not need matching polarity, and are thus easier to install.
Step 6: Attach the Lights.
Attach each light to the main cable using connectors:
- Direct-burial or waterproof connectors.
- Install primary cable in connector.
- Fix the wires of fixtures.
Another way you can do it is through a daisy-chain (series) technique with one cable powering several lights.
Most systems employ so-called piercing connectors which clamp on the wire, but do not cut it.
Step 7: Test System.
Before burying wires:
- Turn on the transformer
- Check each light
- Change the position and angles.
Ensure uniform brightness of all fixtures.
Step 8: Lighting at night.
Wait till night to check your installation:
- Adjust beam angles
- Eliminate glare
- Highlight focal points
This is a massive step in the ultimate appearance.
Step 9: Protect and secure Connections.
Although optional, it’s recommended to:
- Wrap with electrical tape.
- Ensure tight connections
- Withstand moisture and movement.
Proper waterproof connectors are used to ensure that corrosion is avoided with time.
Step 10: Bury the Cable.
Lastly, hide your wiring:
- Carve out a shallow trench (2-6 inches).
- Or cover with mulch or soil
- Hide but do not bury cables.
Low voltage wires typically don’t require deep burial or conduit.
Some of the most common errors.
To achieve sustainable outcomes, do not make the following mistakes:
- Selecting a transformer too small.
- Neglecting voltage drop along long runs.
- Using non-waterproof connectors
- Having lights too near each other.
- Skipping nighttime adjustments
Final Thoughts
One of the simplest ways of making your outdoors area adjustable is by installing low voltage landscape lighting. Having a few tools and spending several hours of work, you can achieve a cozy, welcoming atmosphere and enhance safety and visibility.
You can use this DIY project to light a path, showcase the architecture of your home or add value to your garden both in the short term and in the long term.
- 10 Meters Lamp Post
- 10 Meters Pole
- 1000w Led Projector
- 100W LED Tunnel Light
- 12 Meters Lamp Post
- 12 Meters Pole
- 1200w Led Projector
- 15 Light Pole
- 1500w Led Projector
- 150W LED Tunnel Light
- 1800w Led Projector
- 2 In 1 Solar Flood Light
- 200w Led Tunnel Light
- 50w Led Tunnel Light
- 6 Meters Lamp Post
- 6 Meters Pole
- 8 Meters Lamp Post
- 8 Meters Pole
- 800w Led Projector
- 80w Led Tunnel Light
- Colourful Decorative Light
- Conical post
- Courtyard Lamp
- courtyard light
- courtyard lighting fixture
- Decorative Landscape Light
- Decorative road Light
- Flood Light For Courtyard
- Flood Light for Garden
- Flood Light For Outdoor
- Foot Led High Bay Lights
- high bay led lights 100w
- industrial lampshade
- industrial LED shed lights
- industrial magnifying glass with light
- Integrated Solar Flood Light
- led courtyard lamp
- led courtyard light
- led high bay light 100w
- LED Projector For Stadium
- Led UFO High Bay 150W 5000k
- Lighting Plants Mining Price
- Maintenance Free LED Street Light
- Pic Controlling Tunnel Light
- PLC controlling tunnel light
- Post Top Garden Light
- RGB Landscape Light
- Rgbw Decorative Light
- Smart Tunnel Light
- solar courtyard lamp
- solar courtyard light
- Solar LED Road Light
- Solar Street Light For 10 Meter Pole
- Solar Street Light For 12 Meter Pole
- Solar Street Light For 6 Meter Pole
- Solar Street Light For 8 Meter Pole
- Split Type Solar Flood Light
- Sporting Projector
- Stadium Led Projector
- Street Lighting Post