how to wire landscape lighting?
 FACEBOOK
 TWITTER
 LINKEDIN
One of the simplest and most efficient methods to beautify your outdoors area is through low voltage landscape lighting. Install a 12V lighting system is an easy DIY project whether you want to make your yard safer, show off a garden or even create a cozy atmosphere.
In this guide, you’ll learn how to wire low voltage landscape lighting step by step, including planning, wiring methods, and expert tips to ensure long-lasting performance.
What is Low Voltage Landscape Lighting?
Low voltage landscape lighting uses a voltage of 12 volts as compared to the household power (120 V). It is safer, requires less energy and it is easy to install without assistance of a professional.
An average system consists of:
- A transformer (changes 120 V to 12V)
- Low voltage cables
- Outdoor lamps (path lights, spotlights, etc.)
Due to its flexibility and safety, low voltage lighting is popular in gardens, walkways, patios and driveways of residential areas.
Advantages of Low Voltage Landscape Lighting.
The reason this system is so popular before getting down to installation:
- DIY-Installation safe.
Lower voltage also minimizes the chances of an electric shock, and thus it is user friendly to the beginner.
- Energy Efficient
Uses less power particularly when used with LED fixtures.
- Flexible Design
Your lighting layout is easily expanded or modified.
- Cost-Effective
Reduced installation and maintenance costs over high voltage systems.
Materials and Tools You will require.
To set-up your landscape lighting system, you will need the following:
- This is a low voltage landscape wire (12/2 or 14/2).
- Transformer
- Outdoor light fixtures
- Wire connectors (waterproof)
- Wire stripper/cutter
- Trenching tool or shovel.
Pro Tip: Select direct-burial rated cables that have UV-resistant insulation to survive outside.
Wiring and installation instructions on low voltage landscape lighting.
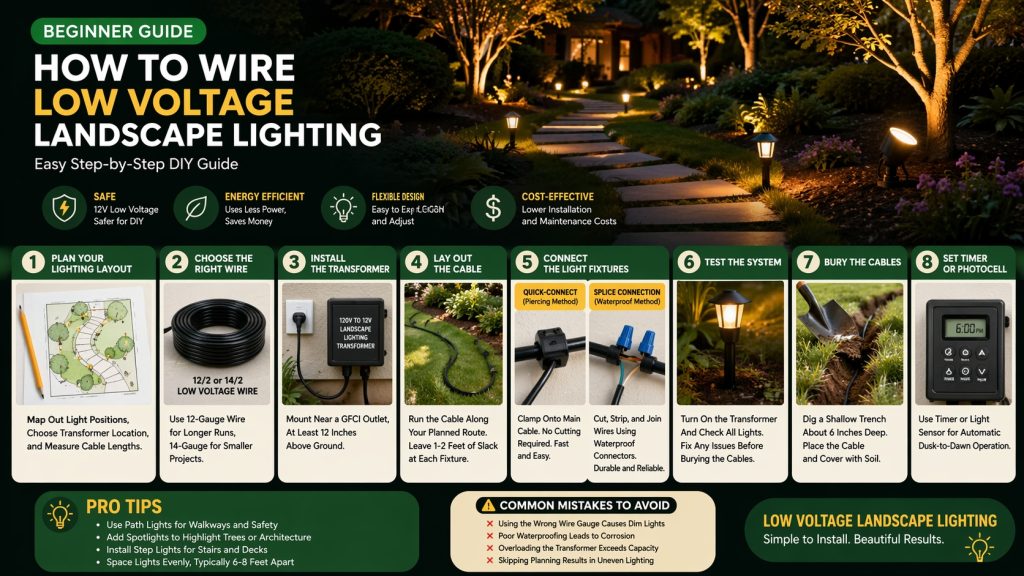
Step 1: Design Your Lighting Plan.
Begin with a basic plan of your yard:
- Decide on the location of lights.
- Choose location of transformer (close to power outlet)
- Measure cable distances
Correct planning will allow equality in the light and avoid cases of voltage drops.
SEO Advice: The keywords such as landscape lighting layout design and outdoor lighting plan should be used to generate search traffic.
Step 2: Select the appropriate gauge of wire.
The thickness of wire influences performance:
- 12-gauge wire: Ideal in long-run or high wattage.
- 14-gauge wire: Use with smaller systems.
Bigger wires lead to less voltage drop and uniform brightness.
Step 3: Install the Transformer
Mount the transformer:
- Close to an outdoor GFCI outlet.
- A minimum of 12 inches above ground.
Attach the main cable to the transformer terminals.
Do not turn it on.
Step 4: Prepare the Cable.
Install the cable along your route:
- Keep it up in the air first.
- Allow 1-2 feet of space at each fixing.
This flexibility enables the adjustments during installation.
Step 5: Attach the Light Fixtures.
Two principal types of wiring are:
Method A: Quick-Connect (Piercing Connectors).
- Attach to the main cable.
- No cutting required
- Fast and beginner-friendly
Method B: Splice Connections
- Cut the main cable
- Take strip wires and connect with waterproof connectors.
- Durability and dependability.
The two techniques are effective, but the waterproof connectors should be used when there is a long period of outdoor work.
Step 6: Test the System
Before burying wires:
- Switch on transformer.
- Check all lights
- Repair broken connections or defective bulbs.
Early testing saves time and money in the future.
Step 7: Bury the Cables.
Once everything works:
- Dig a shallow trench (about 6 inches deep)
- Place the cable and cover it with soil
The low voltage wires do not have to be buried deep thus, it is much easier to install compared to the normal electrical wires.
Step 8: Set Timer or Photocell
Most transformers include:
- Timer settings
- Light sensors (automatic dusk-dawn)
This enhances convenience and energy-saving.
The typical errors to be avoided.
- Wrong wire Gauge.
Excessively small wires result in dim lights owing to voltage drop.
- Poor Waterproofing
Always use connectors that are of the outdoor type so that they do not corrode.
- Overloading the Transformer
Make sure summative wattage of lights does not exceed transformer capacity.
- Skipping Planning
The random placement results in uneven lights and wastage of resources.
Pro Tips for Better Landscape Lighting
- Apply walk and safety path lights.
- Add spotlights to accentuate trees or architecture.
- Install stair and deck step lights.
- Light the space evenly (usually 68 feet) in between.
The mix of types of fixtures adds volume and aestheticism.
Conclusion
One of the simplest and most effective methods of improvement of the outside environment is the installation of low voltage landscape lighting. Even beginners can produce professional results even with proper planning, right materials and careful wiring.
Through this step-by-step guide, you are bound to not only make your home look better but also increase its safety and usability in the night.
- 10 Meters Lamp Post
- 10 Meters Pole
- 1000w Led Projector
- 100W LED Tunnel Light
- 12 Meters Lamp Post
- 12 Meters Pole
- 1200w Led Projector
- 15 Light Pole
- 1500w Led Projector
- 150W LED Tunnel Light
- 1800w Led Projector
- 2 In 1 Solar Flood Light
- 200w Led Tunnel Light
- 50w Led Tunnel Light
- 6 Meters Lamp Post
- 6 Meters Pole
- 8 Meters Lamp Post
- 8 Meters Pole
- 800w Led Projector
- 80w Led Tunnel Light
- Colourful Decorative Light
- Conical post
- Courtyard Lamp
- courtyard light
- courtyard lighting fixture
- Decorative Landscape Light
- Decorative road Light
- Flood Light For Courtyard
- Flood Light for Garden
- Flood Light For Outdoor
- Foot Led High Bay Lights
- high bay led lights 100w
- industrial lampshade
- industrial LED shed lights
- industrial magnifying glass with light
- Integrated Solar Flood Light
- led courtyard lamp
- led courtyard light
- led high bay light 100w
- LED Projector For Stadium
- Led UFO High Bay 150W 5000k
- Lighting Plants Mining Price
- Maintenance Free LED Street Light
- Pic Controlling Tunnel Light
- PLC controlling tunnel light
- Post Top Garden Light
- RGB Landscape Light
- Rgbw Decorative Light
- Smart Tunnel Light
- solar courtyard lamp
- solar courtyard light
- Solar LED Road Light
- Solar Street Light For 10 Meter Pole
- Solar Street Light For 12 Meter Pole
- Solar Street Light For 6 Meter Pole
- Solar Street Light For 8 Meter Pole
- Split Type Solar Flood Light
- Sporting Projector
- Stadium Led Projector
- Street Lighting Post