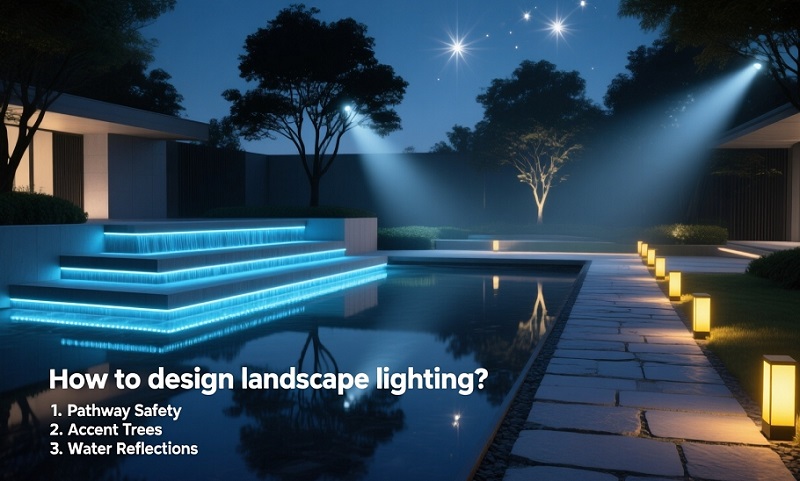
how to design landscape lighting?
 FACEBOOK
 TWITTER
 LINKEDIN
One of the most influential, but frequently underestimated landscape design elements is outdoor lighting. There is a lot more to a well-planned lighting system than just to light up your yard, it makes it safer, more attractive, allows you to use your living space longer and it makes your house inviting and welcoming after the sun sets. Regardless of whether you are creating a backyard oasis, the front yard display or a practical outdoor entertainment space, a well-considered lighting design can make your space entirely different.
This guide will take you through the process of designing outdoor lighting step by step, including the principles of planning, the types of lighting, how to place the lights, and professional lighting design tips to enable you to make your outdoor environment beautiful and useful.
The importance of Outdoor Lighting Design.
Balance, not brightness, is good outdoor lighting. Most of the people who have a home often over-light their area and this may cause glare, flatten visual depth and even decrease comfort. Rather, the current landscape lighting is centered on multidimensional lighting that incorporates both functionality and aesthetics.
There are a number of advantages of professionally designed outdoor lighting:
- Enhanced safety: Adequate lighting minimizes the risk of falling by pathways, stairs, and driveways.
- Increased security: Lighted exteriors keep off unwanted activity.
- Outdoor living: Patios, decks and gardens are used at night.
- Greater curb appeal: The use of lighting emphasis on architectural and landscape elements.
- Emotional feel: Soft lighting produces a calming effect of a friendly environment.
Proper lighting transforms a normal yard into an aesthetically dynamic nighttime space.
Step 1: Start with a Lighting Plan
Start with a lighting plan before selecting fixtures. Go round your property at night and determine the utilization of the space.
Ask yourself:
- In what places do people walk the most?
- Where will safety lighting be required?
- What are the features to be highlighted at night?
- Where do you unwind, eat, or have fun outside?
Break down your outdoor space into functional areas:
- Entrances and front yard (first impression)
- Driveways and paths (safety and navigation)
- Garden and landscape elements (visual emphasis).
- Outdoor living rooms (comfort and ambiance)
This is a form of zoning whereby all the lights are purposely placed and not randomly placed.
Step 2: Apply Lighting Layers to create Depth and Balance.
One of the most important principles in outdoor lighting design is layering. Using more than one source of light is a way to add depth and visual appeal rather than just one source of lighting.
It consists of three basic layers:
- Ambient Lighting
This gives general light and establishes the minimum level of light. These can be wall-mounted fixtures, porch lights or soft floodlights.
- Task Lighting
Task lighting targets certain functional sectors such as ladders, walkways and outdoor kitchens. It guarantees safe mobility and usage.
- Accent Lighting
Accent lighting is used to emphasize areas of interest like trees, sculptures, water features, or architectural features. It is applied to make drama and visual emphasis.
Combined with these layers, your outdoor space will be purposeful, harmonized and professionally created.
Step 3: Mark the Important Landscape and Architectural Elements.
The lighting outdoors must be used to lead the eye to what is most appealing in your property. Do not illuminate everything, concentrate on those features that are worth being displayed.
Popular areas of focus are:
- Large trees or decorative plants.
- Textured walls and stone-textured walls.
- Columns, arches, and portals.
- Fountains and garden statues.
Popular techniques include:
- Uplighting: Lights used at the floor level and shone upwards to highlight height and form.
- Downlighting (moonlighting): Lamps that are placed high to resemble natural moonlight.
- Lighting: Light cast behind objects to form dramatic silhouettes.
- Wall washing: Uniform light on surfaces to emphasize texture.
These effects bring in depth and sophistication and avoid flat or harsh lighting effects.
Step 4: Safety and Style Light Pathways and Driveways.
Path lighting is vital in safety, as well as design. Lighted paths direct visitors to naturally flow through your environment and also improves the nighttime beauty.
Best practices include:
- Install lights in equal quantity in the paths.
- Do not use too bright or glaring fixtures.
- Warm white light should be used to create a warm atmosphere.
- Slightly offset lights to provide a more natural rhythm.
The driveways, stairs and entry paths must be visible, yet not too bright. Light is best done subtly rather than flooding with bright lights.
Step 5: Improve Outdoor Spaces.
Patios, decks, pergolas, outdoor kitchens, and other outdoor living areas are some of the areas that outdoor lighting design can be of great benefit.
Popular solutions include:
- String lights to provide ambient lighting.
- Safety and classy recessed deck lights.
- Wall lamps to structure and define.
- Lighting with pergolas or trees to resemble natural.
This is meant to make it a cozy place that people can sit back, eat and socialise even after the sun goes down.
You can add dimmers or smart lighting controls to control the brightness according to the mood: bright when you have a party, soft when you want to relax.
Step 6: Select the Perfect Color Temperature.
The temperature of color makes a significant influence on the mood of your outside environment.
- 2700K3000K (Warm white): Best used in patios, gardens and residential areas.
- 3000K3500K (Neutral white): Neutral to mix outdoor use.
- 4000K+ (Cool white): Should be used when it is always needed.
The warm light is generally used as it is more natural, comfortable and welcoming.
Step 7: How to prevent most Outdoor Lighting errors.
Even the good designs of lighting may fail unless done well. Some of the pitfalls to avoid include:
- Over-lighting the space
- Overuse of types of fixtures without a plan.
- Installation of lights that are too near each other.
- Disregard of shadows and contrast.
- Excessive lighting temperatures (either too cool or too harsh).
Less is often more when it comes to outdoor lighting. It is strategic positioning, rather than the quantity.
Step 8:Take into account Energy Efficiency and Smart Controls.
Outdoor lights are becoming more energy saving and tailored in the modern world.
Consider using:
- Long-lasting and low-energy LED fixtures.
- Eco-friendly solar lighting.
- Security lighting motion sensors.
- Automated timers or applications.
These technologies enhance the convenience and decrease the long-term energy expenses.
Final Thoughts
The art and science of designing outdoor lighting are both challenging. The functionality plus creativity is the best bet- make your space safe, usable and beautiful to look at.
Layered lighting, emphasizing the most important aspects, and the appropriate color temperature will help you to make any outdoor space a glamorously lit continuation of your living room.
Going on with a small back yard upgrade or designing a complete landscape light system, always consider planning, and you will always achieve great results.
- 10 Meters Lamp Post
- 10 Meters Pole
- 1000w Led Projector
- 100W LED Tunnel Light
- 12 Meters Lamp Post
- 12 Meters Pole
- 1200w Led Projector
- 15 Light Pole
- 1500w Led Projector
- 150W LED Tunnel Light
- 1800w Led Projector
- 2 In 1 Solar Flood Light
- 200w Led Tunnel Light
- 50w Led Tunnel Light
- 6 Meters Lamp Post
- 6 Meters Pole
- 8 Meters Lamp Post
- 8 Meters Pole
- 800w Led Projector
- 80w Led Tunnel Light
- Colourful Decorative Light
- Conical post
- Courtyard Lamp
- courtyard light
- courtyard lighting fixture
- Decorative Landscape Light
- Decorative road Light
- Flood Light For Courtyard
- Flood Light for Garden
- Flood Light For Outdoor
- Foot Led High Bay Lights
- high bay led lights 100w
- industrial lampshade
- industrial LED shed lights
- industrial magnifying glass with light
- Integrated Solar Flood Light
- led courtyard lamp
- led courtyard light
- led high bay light 100w
- LED Projector For Stadium
- Led UFO High Bay 150W 5000k
- Lighting Plants Mining Price
- Maintenance Free LED Street Light
- Pic Controlling Tunnel Light
- PLC controlling tunnel light
- Post Top Garden Light
- RGB Landscape Light
- Rgbw Decorative Light
- Smart Tunnel Light
- solar courtyard lamp
- solar courtyard light
- Solar LED Road Light
- Solar Street Light For 10 Meter Pole
- Solar Street Light For 12 Meter Pole
- Solar Street Light For 6 Meter Pole
- Solar Street Light For 8 Meter Pole
- Split Type Solar Flood Light
- Sporting Projector
- Stadium Led Projector
- Street Lighting Post