how to install low voltage landscape lighting?
 FACEBOOK
 TWITTER
 LINKEDIN
One of the best methods of transforming your outdoor space is by installing low voltage landscape lighting. It enhances night appeal, increases safety and a cozy, inviting environment. The best part? It’s a beginner-friendly DIY project that doesn’t require a licensed electrician.
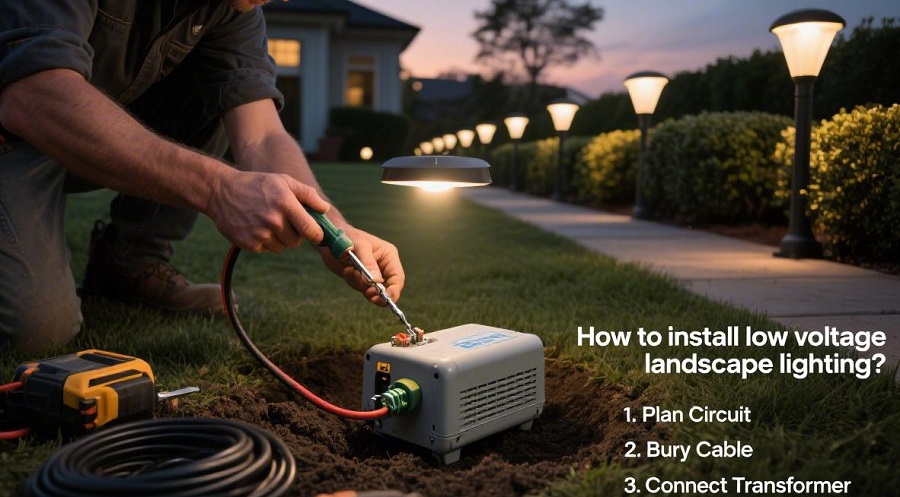
You’ll know how to install low voltage landscape lighting in stages in this guide, such as planning your layout, wiring and testing the system.
What is the Reason to Use Low Voltage Landscape Lighting?
Low voltage lighting is usually operated at 12-volt, and is fed by a transformer to convert the normal 120-volt domestic electricity to a lower and safer voltage.
This renders it perfect to be used in residential outdoors since it is:
- Easy to install and use as opposed to high-voltage systems.
- Energy saving particularly with LED lamps.
- Elastic and extendable to upgrades.
- Easy-to-assemble, needing simple tools.
Low voltage lighting offers professional appearance in lighting up walkways, gardens, trees, or patios, without having to do complicated electrical work.
Step 1: Design Your Landscape Lighting Plan.
The most significant thing in every lighting project is good planning.
Begin by taking a stroll on your yard at night and pinpoint areas that you would like to light:
- Pathways and walkways
- Entryways and driveways
- Garden beds, trees, and shrubs.
- Architectural features of your home
Next draw a rough layout map. Mark where each light will be placed and the running paths of cables between them.
Planning Tips:
- Light spacing of space paths at a distance of 6-8 feet to achieve equal lighting.
- Do not over-space lights and keep them at a distance.
- Zoned lighting to increase better control and energy efficiency.
Even brightness is guaranteed with a well-designed plan, and rewiring will not be necessary in the future.
Step 2: Select the suitable Transformer and Materials.
The centre of your lighting system is the transformer. It lowers the household voltage (120 V) to 12V to make it safe to use outdoors.
You will need:
- Low voltage transformer (rated in total wattage of all lights)
- Wireless LED lamps (path lights, spotlights and others).
- Outdoor cable (12/2 or 14/2 gauge wire)
- Waterproof wire connectors
- Wire stripper and screwdriver.
- Trenching or shovel tool.
- Timer or photocell (not compulsory yet advisable)
Transformer Sizing Tip:
To be on the safe side, always select a transformer with 20-30 percent greater capacity than your total lighting wattage.
Step 3: Attach and install the Transformer.
Install the transformer with an outdoor GFCI-protected outlet. It should be:
- At least 12 inches high above the ground.
- Guarded against direct rain and sprinklers.
- Easily accessible for maintenance
Attach it to a wall, post or hard surface. Only after all the wiring is finished, plug it in.
You have a timer or photocell in your transformer, now set it so that at dusk and dawn your lights turn on and off automatically.
Step 4: Roll out Low Voltage Cable.
Before you start excavating or joining anything unroll your lighting cable along the route you have planned.
Key tips:
- Allow additional slack in every location of the fixtures.
- Avoid sharp bends in the wire
- Make cable runs as short and straight as possible.
This will assist you to visualize the system and make changes prior to permanent installation.
step 5:Install and Connect the Light Fixtures .
Now it’s time to connect your lights to the main cable.
The majority of systems involve quick-connect or pierce-style connectors which are direct mount connectors that are attached to the buried cable.
Installation process:
- Install each of the fittings in its intended position.
- Attach the connector to the main cable
- Clamp it in place by pressing or tightening until it goes through the insulation.
- Check one light and then to the next.
Ensure that all the fixtures are in place and properly positioned.
Step 6: Cover the Cable and seal the System.
After attaching all the fixtures and testing, the burying of the cable can be done.
Recommended depth:
- Most garden beds and soft soil 3-6 inches.
- Greater (up to 6-12 inches) in pedestrian zones.
Wire should be covered with soil, mulch or grass to finish it clean.
When digging be careful not to cut the cable. When making narrow trenches a flat shovel or edging tool is the best.
Step 7: Test the complete lighting system.
Once everything has been installed:
- Plug in the transformer
- Turn the system on at night
- Go around the yard to examine all the lights.
Look for:
- Flashing or defective lights.
- Uneven brightness
- Misaligned lighting angles
When a light is not turning on, examine the connector- the most frequent problem is loose or pierced wires.
Step 8: fine-tune and refine your lighting design.
Now comes the creative part.
Tune each of the fixtures to the effect you want:
- Angle Spotlights upwards to accentuate trees or walls.
- Lighten up pathway lights to prevent glare.
- Balance brightness for a natural nighttime look
Make time to move about your yard in various positions. The intention is to develop depth, balance and visual interest.
Some of the most common errors.
Although low voltage lighting is easy to assemble, newcomers usually commit the following mistakes:
- Wire Which is too small in size resulting in dim lights at the end of the run.
- Missing waterproof connectors, which results in corrosion.
- Exceeding the capacity of the transformer.
- Having lights too near each other, making too much brightness.
By eliminating these problems, you will be guaranteed of a system that will last years.
Final Thoughts
One of the simplest methods of upgrading the outside of your home is by installing low voltage landscape lighting. All you need to do is have a basic design, the correct materials and to install them with caution and you can have a professional-looking lighting system in a weekend.
It makes your home look much nicer at night, in addition to improving safety and visibility.
Low voltage landscape lighting is one of the projects that you can undertake in case you want to have a low cost DIY upgrade but with high visual appeal.

- 10 Meters Lamp Post
- 10 Meters Pole
- 1000w Led Projector
- 100W LED Tunnel Light
- 12 Meters Lamp Post
- 12 Meters Pole
- 1200w Led Projector
- 15 Light Pole
- 1500w Led Projector
- 150W LED Tunnel Light
- 1800w Led Projector
- 2 In 1 Solar Flood Light
- 200w Led Tunnel Light
- 50w Led Tunnel Light
- 6 Meters Lamp Post
- 6 Meters Pole
- 8 Meters Lamp Post
- 8 Meters Pole
- 800w Led Projector
- 80w Led Tunnel Light
- Colourful Decorative Light
- Conical post
- Courtyard Lamp
- courtyard light
- courtyard lighting fixture
- Decorative Landscape Light
- Decorative road Light
- Flood Light For Courtyard
- Flood Light for Garden
- Flood Light For Outdoor
- Foot Led High Bay Lights
- high bay led lights 100w
- industrial lampshade
- industrial LED shed lights
- industrial magnifying glass with light
- Integrated Solar Flood Light
- led courtyard lamp
- led courtyard light
- led high bay light 100w
- LED Projector For Stadium
- Led UFO High Bay 150W 5000k
- Lighting Plants Mining Price
- Maintenance Free LED Street Light
- Pic Controlling Tunnel Light
- PLC controlling tunnel light
- Post Top Garden Light
- RGB Landscape Light
- Rgbw Decorative Light
- Smart Tunnel Light
- solar courtyard lamp
- solar courtyard light
- Solar LED Road Light
- Solar Street Light For 10 Meter Pole
- Solar Street Light For 12 Meter Pole
- Solar Street Light For 6 Meter Pole
- Solar Street Light For 8 Meter Pole
- Split Type Solar Flood Light
- Sporting Projector
- Stadium Led Projector
- Street Lighting Post