how to do landscape lighting
 FACEBOOK
 TWITTER
 LINKEDIN
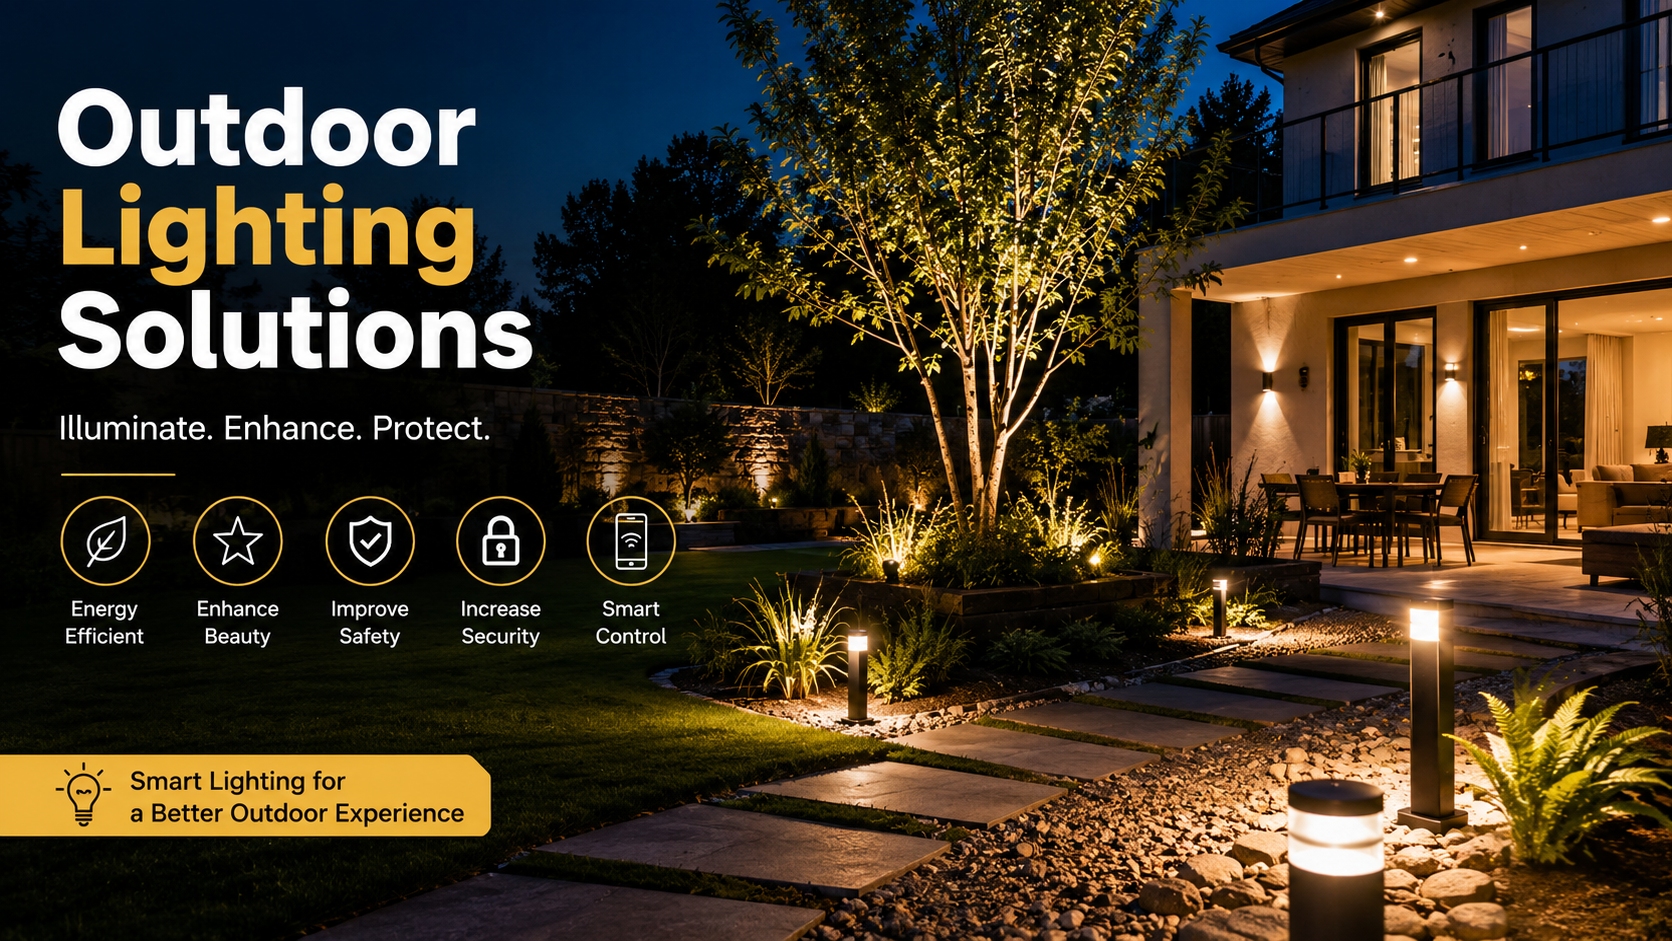
One of the best ways to transform your outdoor living space is through landscape lighting. An appropriately designed lighting system can enhance the curb appeal, make a neighborhood safer after dark, draw attention to architectural details and provide a cozy ambiance for outdoor entertaining. Landscape lighting can enhance the exterior of your home in a variety of ways, whether you are lighting your pathways, garden, patio, or trees.
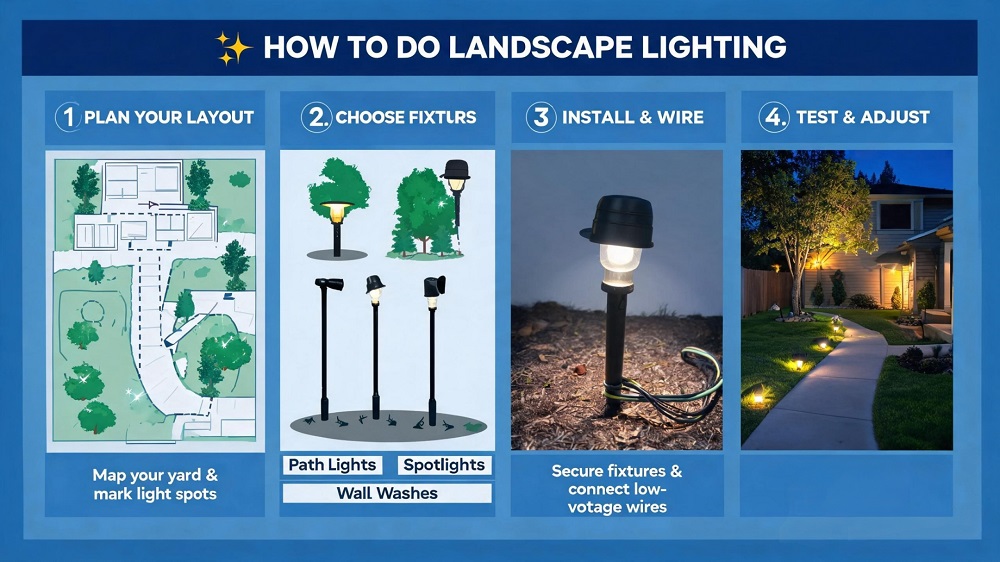
It takes you step by step through all the steps in creating your landscape lighting from planning to testing.
Why Landscape Lighting Matters
Outdoor lighting not only adds beauty to your landscape, it can also enhance your home’s ability and security. Lighting is essential for reducing accident risks along walkways, and makes your property more attractive at night. It is best to use layered lighting, mixing pathway lights, accent lights and ambient lighting to create the most visually pleasing atmosphere.
Low voltage landscape lighting is particularly popular because they are both energy efficient and generally easier and safer to install than high voltage landscape lighting. Installation experts say most home landscape lighting installations can be done using shallow trenches and causing little disruption to the yard.
Step 1: Plan Your Landscape Lighting Design
Before purchasing fixtures or digging trenches, create a lighting plan for your property.
Focus on key areas such as:
- Walkways and driveways
- Garden beds
- Trees and shrubs
- Outdoor seating areas
- Architectural details
- Water features
Don’t over light your lawn. In landscape design, the professional designers favor that instead of providing much light to the whole landscape, minor light is provided. A single fixture can often produce a more stylish look than several lights.
The best color temperature for outdoor lighting generally is warm white (2700K to 3000K) for its natural and inviting atmosphere.
Step 2: Choose the Right Type of Landscape Lighting
There are three common types of outdoor landscape lighting systems:
Low-Voltage Lighting
For homeowners, the most popular choice is low voltage systems. They convert normal, household electric power to safer 12-volt by using a transformer.
Benefits include:
- Easy installation
- Energy efficiency
- Lower operating costs
- Safer wiring
- Flexible fixture placement
Solar Landscape Lighting
Solar lights are easy to put up since they don’t need to be wired into an electrical circuit. These are effective for decorative use and for small pathways, but generally they are not as bright or reliable as wired systems.
Line-Voltage Lighting
A line-voltage system is the standard home power system, and usually, requires a professional install. These are ideal for larger properties and/or heavy lighting usage.
Step 3: Mark Underground Utilities
Check for underground utilities and irrigation lines before digging.
Please reach out to the local utility marking service prior to installation. This can cause costly repairs to electrical wires, water mains or irrigation systems, and create a risk for injury.
After utilities have been identified, clearly mark them with flags or spray paint. This is an easy measure to avoid accidental damage while trenching.
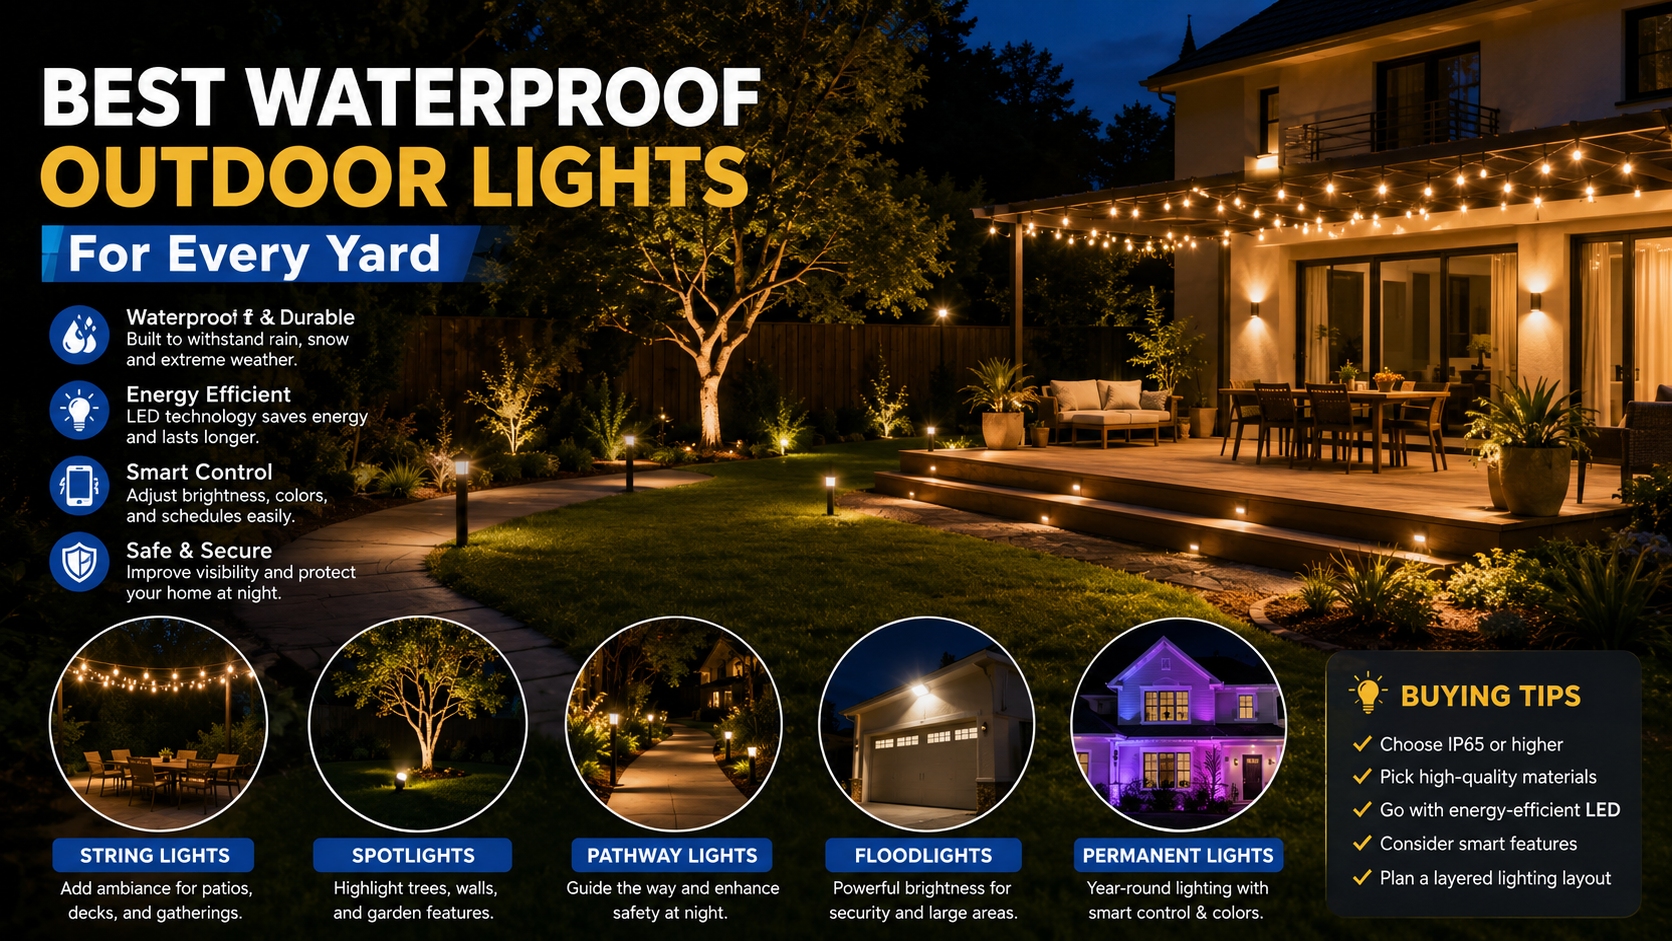
Step 4: Select High-Quality Fixtures
Outdoor fixtures should resist moisture, temperature variations, dirt and rain. Select materials that can last a long time, like brass, copper or stainless steel.
Some types of landscape lighting fixtures include:
- Path lights
- Spotlights
- Floodlights
- Deck lights
- Well lights
- Step lights
The use of LED fixtures is encouraged as they use less power and have a much longer lifespan than conventional lighting.
Step 5: Install the Transformer
The transformer is the center of a low voltage lighting system. It converts electricity to safe low voltage power for outdoor use.
Mount the transformer:
- Near a GFCI outdoor outlet
- In a dry, ventilated area
- Above ground level
- Away from direct sprinkler spray
Plug-in transformers are used in many modern systems, which is safer and easier for homeowners to install than hard-wired electrical connections. Most of the time when professional installers and homeowners discuss plug-in transformers for landscape lighting systems, they refer to them as very common.
Step 6: Dig Trenches for Wiring
Low-voltage wire usually only needs a shallow trench.
In most cases:
- Trenches should be about 6 inches deep
- Wires should follow the shortest practical route
- Cables should avoid sharp bends and high-traffic areas
A flat trenching shovel or garden edger works well for this task. Some DIY installers even use a narrow shovel slit to minimize lawn damage.
Step 7: Lay and Connect the Wiring
After trenching, lay the low-voltage cable along your planned route.
When connecting fixtures:
- Use waterproof wire connectors
- Avoid stretching or kinking wires
- Leave some slack for future adjustments
- Keep cables away from irrigation systems
Many experienced installers suggest that when installing new fixtures they should be hardwired to the main low voltage cable, rather than reused fixture leads. Extra waterproofing around connectors can also enhance long-term durability in outdoor applications.
Step 8: Position the Fixtures Properly
Fixture placement has a major impact on the final appearance of your landscape lighting system.
Path Lighting
Place path lights far enough apart to create pools of light instead of a continuous runway effect. Staggered placement often looks more natural and elegant.
Tree Lighting
Use uplights at the base of trees to create dramatic shadows and depth. Experts often recommend one well-placed light per tree rather than excessive illumination.
Accent Lighting
Spotlights can highlight stone walls, fountains, statues, or architectural details. Experiment with beam angles to create the desired visual effect.
Step 9: Test the Entire System
Before burying wires completely, test every fixture.
Check for:
- Even brightness
- Loose connections
- Flickering lights
- Incorrect beam angles
- Voltage drop issues
Walk around your yard at night to evaluate the overall lighting effect. Minor adjustments to fixture direction can make a significant difference in the final appearance.
Step 10: Add Timers and Smart Controls
Modern landscape lighting systems often include automation features such as:
- Timers
- Motion sensors
- Photocells
- Smart plugs
- Wi-Fi controls
Smart outdoor plugs can enable homeowners to program lighting to turn on and off at specific times or manage systems via their mobile devices.
Automation not only makes it more convenient, but it also cuts down on unnecessary energy consumption.
Common Landscape Lighting Mistakes to Avoid
Over-Lighting the Yard
Excessive light can create a harsh, unnatural look in your landscape. A dim light would generally appear more professional.
Mixing Color Temperatures
Warm and cool bulbs are frequently in contrast and don’t look consistent. Use a consistent colour temperature throughout the home for a harmonious look.
Poor Wire Protection
Loose wires or wires that are exposed can cause failures in the system over time. Ensure that weatherproof connectors are used and cables are properly buried.
Ignoring Future Expansion
Allow space in transformer for future fixture additions. Over time many homeowners add more lights to their landscape lighting system.
Final Thoughts
One of the best landscape investments is landscape lighting. A professionally designed system makes your yard look beautiful, safer and more usable well after dark.
Most homeowners can successfully install their own low-voltage landscape lighting system with careful planning, quality fixtures, and installation. Try to use a few lights and highlight the items with subtle lighting, warm lighting tones and strategic placement of lights.
From pathways to gardens, patios to architecture—each can be transformed at night with a well-planned landscape lighting system.
- 10 Meters Lamp Post
- 10 Meters Pole
- 1000w Led Projector
- 100W LED Tunnel Light
- 12 Meters Lamp Post
- 12 Meters Pole
- 1200w Led Projector
- 15 Light Pole
- 1500w Led Projector
- 150W LED Tunnel Light
- 1800w Led Projector
- 2 In 1 Solar Flood Light
- 200w Led Tunnel Light
- 50w Led Tunnel Light
- 6 Meters Lamp Post
- 6 Meters Pole
- 8 Meters Lamp Post
- 8 Meters Pole
- 800w Led Projector
- 80w Led Tunnel Light
- Colourful Decorative Light
- Conical post
- Courtyard Lamp
- courtyard light
- courtyard lighting fixture
- Decorative Landscape Light
- Decorative road Light
- Flood Light For Courtyard
- Flood Light for Garden
- Flood Light For Outdoor
- Foot Led High Bay Lights
- high bay led lights 100w
- industrial lampshade
- industrial LED shed lights
- industrial magnifying glass with light
- Integrated Solar Flood Light
- led courtyard lamp
- led courtyard light
- led high bay light 100w
- LED Projector For Stadium
- Led UFO High Bay 150W 5000k
- Lighting Plants Mining Price
- Maintenance Free LED Street Light
- Pic Controlling Tunnel Light
- PLC controlling tunnel light
- Post Top Garden Light
- RGB Landscape Light
- Rgbw Decorative Light
- Smart Tunnel Light
- solar courtyard lamp
- solar courtyard light
- Solar LED Road Light
- Solar Street Light For 10 Meter Pole
- Solar Street Light For 12 Meter Pole
- Solar Street Light For 6 Meter Pole
- Solar Street Light For 8 Meter Pole
- Split Type Solar Flood Light
- Sporting Projector
- Stadium Led Projector
- Street Lighting Post