how to fix solar landscape lights
 FACEBOOK
 TWITTER
 LINKEDIN
Does your back garden feel a little gloomy these days? Nothing can be worse than stepping out at dusk to imagine your garden would be lit up with eco friendly, warm solar lights, but finding them not working. Don’t toss them in the trash and purchase replacements, take a deep breath.
In fact, the majority of solar light problems can be solved very easily. In reality, the majority of malfunctions are related to dirty panels, dead batteries, or minor water damage. But you don’t have to be an electrician to restore life to your outdoor area.
This complete diagnostic, troubleshooting and repair guide will take you through the process, step by step. Revitalize your landscape!
Why Won’t My Solar Lights Turn On? (Top 5 Culprits)
The first step to resolution is to identify the cause of the issue. Solar lights are exposed to the elements 24/7, making them susceptible to a few common issues. Here are some of the most common causes for your lights to be failing:
- Dirty or Shaded Solar Panels: Even a thin layer of dust, pollen, or bird droppings can slash your panel’s charging efficiency by 50–70%. Without direct, unobstructed sunlight, the battery simply won’t get the juice it needs to last through the night.
- Dead or Corroded Batteries: Rechargeable batteries (usually NiMH or Lithium-ion) have a finite lifespan. After 2–3 years of daily charge cycles and temperature swings, they lose their ability to hold a charge. Corrosion on the terminals can also block the flow of electricity.
- Water Damage: Rain, sprinklers, and humidity are the enemies of electronics. If the rubber seal on your light cracks, moisture can seep in, leading to short circuits and erratic behavior.
- Faulty Light Sensors: The sensor tells the light when it’s dark enough to turn on. If it gets covered in dirt or is confused by nearby artificial light (like a porch bulb), it might stay off all night.
- Burnt-Out LEDs: While LEDs are designed to last up to 50,000 hours, voltage spikes or internal moisture can cause them to burn out prematurely.
Essential Toolkit for Solar Light Repairs
Before you start troubleshooting, gather a few basic household items and tools. Having these on hand will make the repair process smooth and frustration-free:
- A Soft Microfiber Cloth & Isopropyl Alcohol: For gently cleaning the solar panels and sensors without scratching them.
- White Vinegar & Water (1:1 solution): A mild, eco-friendly cleaner for stubborn grime on the panels.
- A Small Screwdriver Set: To open the battery compartments and housings.
- A Multimeter: Essential for testing battery voltage and checking if your LEDs are still functional.
- Silicone Sealant (Waterproof): To reseal any cracks and make your lights watertight again.
- Replacement Batteries: Make sure you have the correct voltage (usually 1.2V NiMH or 3.2V LiFePO4) ready to go.
Step-by-Step Troubleshooting Guide
Ready to play doctor? Follow these steps in order to systematically diagnose and fix your solar lights.
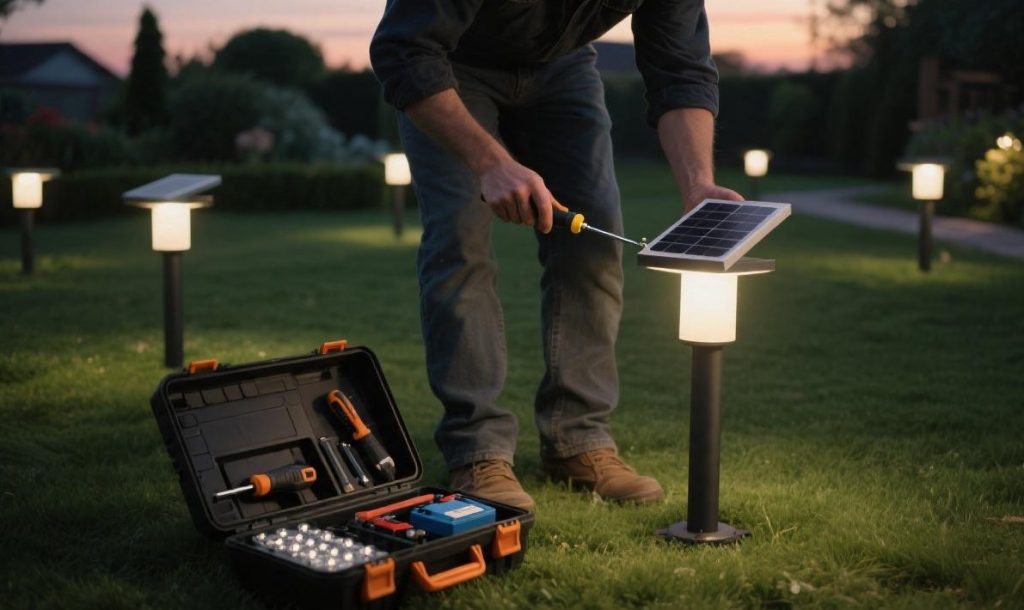
Step 1: Check the Power Source (Clean the Panel!)
In the event that your light doesn’t turn on, make a move with the most common problem: dirty panel. Gently scrub solar cell with the microfiber cloth and vinegar solution. Make sure the panel gets at least 6 hours of direct sunlight every day. Prune any overhanging branches or foliage that could be causing a shadow.
Step 2: Inspect the Batteries
Remove the battery cover. Gently remove the white or green fuzzy corrosion (if present) with a pencil eraser. Replace with new rechargeable batteries, if they are over two years old. To make it easier to remember when it is time to replace the new batteries, you can write the installation date on the new batteries with a marker for future reference.
Step 3: Test the Light Sensor
Shade solar panel with opaque tape or hand all day. If the light is on, the sensor is working but it may be just dirty. Thoroughly wipe it down with a little isopropyl alcohol. If the light fails to turn on, it is possible there is an internal error or that the sensor has a problem.
Step 4: Check for Water Damage
If the light flashes on once then it goes out, there’s a possibility of moisture. Disassemble the light and examine the wiring. Dry all parts thoroughly inside using a hairdryer set to a low cool setting. After drying, put in another bead of silicone sealant around the housing edge to avoid further leakage.
Step 5: Diagnose the LEDs
If the battery and sensor are OK, but the light is not on, then you may have a broken LED. Adjust your multimeter to the “continuity” setting, then connect the probes to the LED’s terminals.Place your multimeters in the “continuity” setting and connect the probes to the LED’s terminals. If the multimeter doesn’t beep, the LED is dead. The old LED can be desoldered and replaced with a new LED that is compatible with 2.5V–3V.
Solar Light Not Working Even After Changing the Battery?
It’s incredibly frustrating to pop in a fresh set of batteries only to find the light stillwon’t turn on. If this happens, check these three things:
- Reversed Polarity: Double-check that the positive (+) and negative (-) ends of the battery are matching the diagram inside the compartment.
- Incorrect Battery Type: Never use standard alkaline batteries. They are not designed to be recharged by the solar panel and can actually damage the internal controller. Always use rechargeable NiMH or Lithium batteries.
- The System Needs a Reset: Sometimes the internal circuitry just needs a hard reboot. Remove the batteries, turn the switch to “OFF,” and leave it for 30 minutes. Put the batteries back in, flip the switch to “ON,” and cover the panel for 5 seconds to reactivate the sensor.
Proactive Maintenance Tips (Prevention is Key)
The best way to fix a solar light is to never let it break in the first place. solar lights are “set it and forget it” until they aren’t. Incorporate these simple habits to extend their lifespan:
- Monthly Quick Clean: Once a month, wipe down the solar panels with a damp cloth to keep them free of dust and pollen.
- Tighten Screws: Vibrations from wind or lawn mowing can loosen housings over time. Check and tighten the screws periodically to maintain a watertight seal.
- Store Them in Winter: If you live in an area with freezing temperatures, the cold can permanently damage rechargeable batteries. Bring your solar lights indoors during the harshest winter months to protect the cells.
Frequently Asked Questions (FAQs)
Q: Can I use regular AA batteries in solar lights?
A: No. Standard alkaline batteries are not rechargeable. Using them can cause leakage or damage the solar light’s charging circuit. Always use rechargeable NiMH or LiFePO4 batteries.
Q: Why do my solar lights die so quickly in the winter?
A: Cold weather has a big impact on batteries efficiency and capacity. Plus, the sun is also lower in the sky and sets earlier, so the panels receive less sunlight to charge. The use of cold-rated lithium batteries can contribute to addressing this problem.
Q: How do I know if my solar panel is broken?
A: Use a multimeter to test the voltage of the panel while it’s in direct sunlight. If it’s reading near 0 volts, the panel itself may be damaged or the internal wires may be severed.
Q: Can I fix broken solar panel wires?
A: Yes! If the wire is frayed or disconnected, it is possible to remove the ends and twist them back together, then covering with heat shrink tubing or electrical tape. Just ensure that the connection is totally waterproof at the end of the day.
Conclusion
Having some solar lights that don’t work can be a headache, but as we’ve demonstrated, it is not engineering class required to repair them. Generally, all it takes is a simple cleaning, battery replacement or a patch of silicone sealant to get your outdoor lighting working again.
So, following this troubleshooting guide, you can cut down on waste, save money and enjoy a lovely garden with lights all year round. Shine on!

- 10 Meters Lamp Post
- 10 Meters Pole
- 1000w Led Projector
- 100W LED Tunnel Light
- 12 Meters Lamp Post
- 12 Meters Pole
- 1200w Led Projector
- 15 Light Pole
- 1500w Led Projector
- 150W LED Tunnel Light
- 1800w Led Projector
- 2 In 1 Solar Flood Light
- 200w Led Tunnel Light
- 50w Led Tunnel Light
- 6 Meters Lamp Post
- 6 Meters Pole
- 8 Meters Lamp Post
- 8 Meters Pole
- 800w Led Projector
- 80w Led Tunnel Light
- Colourful Decorative Light
- Conical post
- Courtyard Lamp
- courtyard light
- courtyard lighting fixture
- Decorative Landscape Light
- Decorative road Light
- Flood Light For Courtyard
- Flood Light for Garden
- Flood Light For Outdoor
- Foot Led High Bay Lights
- high bay led lights 100w
- industrial lampshade
- industrial LED shed lights
- industrial magnifying glass with light
- Integrated Solar Flood Light
- led courtyard lamp
- led courtyard light
- led high bay light 100w
- LED Projector For Stadium
- Led UFO High Bay 150W 5000k
- Lighting Plants Mining Price
- Maintenance Free LED Street Light
- Pic Controlling Tunnel Light
- PLC controlling tunnel light
- Post Top Garden Light
- RGB Landscape Light
- Rgbw Decorative Light
- Smart Tunnel Light
- solar courtyard lamp
- solar courtyard light
- Solar LED Road Light
- Solar Street Light For 10 Meter Pole
- Solar Street Light For 12 Meter Pole
- Solar Street Light For 6 Meter Pole
- Solar Street Light For 8 Meter Pole
- Split Type Solar Flood Light
- Sporting Projector
- Stadium Led Projector
- Street Lighting Post