how to install a wall sconce light fixture
 FACEBOOK
 TWITTER
 LINKEDIN
Wall sconces are versatile light fixtures that can be used in various spaces of modern homes or commercial buildings. Walls sconces are not only functional, but they’re also stylish, and can be used in a variety of ways, from adding ambiance to a bedroom, highlighting artwork in a hallway, to making for a better bathroom. Fortunately, installing a sconce can be a straightforward DIY job if you follow the proper procedures and safety precautions.
Here, you will learn how to install a wall sconce, the tools you will need, and the appropriate height for mounting the sconce and expert tips to achieve a professional finish.
Why Install a Wall Sconce?
Wall sconces provide several advantages over traditional ceiling fixtures:
- Save floor and table space
- Add decorative appeal to any room
- Create layered lighting for improved ambiance
- Highlight architectural features and artwork
- Improve task lighting in bathrooms, bedrooms, and hallways
Wall sconces when placed correctly can really enhance the ambiance of a room and also improve its functionality.
Tools and Materials Needed
Prior to installation, be sure to have the following tools and materials available:
Tools
- Stud finder
- Tape measure
- Pencil
- Level
- Screwdriver
- Drill and drill bits
- Wire stripper
- Voltage tester
- Drywall saw
Materials
- Wall sconce fixture
- Electrical box
- Electrical cable
- Wire connectors
- Mounting hardware
- Drywall anchors (if necessary)
Preparing all materials in advance will help to streamline and secure installation.
Choosing the Best Location
It is important that it is placed correctly for both visual and functional purposes.
General Height Recommendations
Placement will vary depending on the room and the purpose, but most designers recommend sconces for walls:
- 60–72 inches from the floor for general lighting
- 60–70 inches from the floor beside bathroom mirrors
- 48–60 inches from the floor near headboards
- Slightly above eye level in hallways and living spaces
The goal is to position the light source so it provides comfortable illumination without causing glare.
Consider Existing Wiring
If a sconce is going to be installed over an existing electrical outlet or close to an existing circuit, it may be easier to do the project. Installing new electrical wiring in the walls could involve more work and must meet local electrical codes.
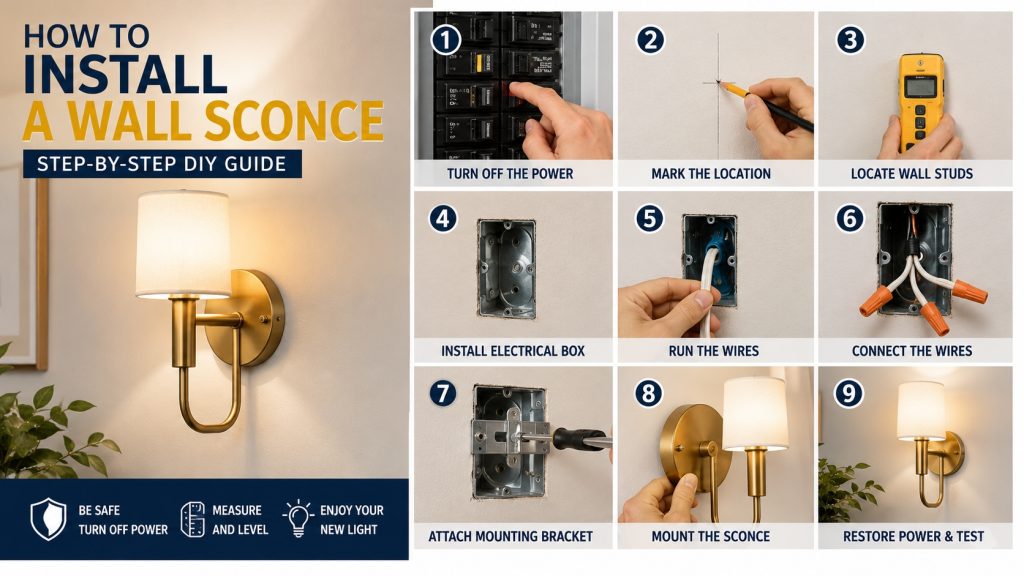
Step 1: Turn Off the Power
Always put safety first.
Find the circuit breaker for the space in which you’re going to work and turn it off. Check with a voltage detector to make sure there is no electricity running through the wires before touching them.
Avoid using only a wall switch to turn off the power.
Step 2: Mark the Installation Location
Take accurate measurements with tape measure and level to ensure the correct mounting position.
Mark off the center-point where the box for the electrical service is to be installed. When installing several sconces, take great care to make sure that they are symmetrical.
Sconces will usually be found on both sides of the mirror on a bathroom vanity where lighting is balanced.
Step 3: Locate Wall Studs
Use a stud finder to identify nearby wall studs.
Depending on your fixture design, you may:
- Mount directly to a stud for maximum support
- Use an electrical box attached to a stud
- Install drywall anchors if the fixture is lightweight
Most decorative sconces can be safely supported with appropriate wall anchors when a stud isn’t available.
Step 4: Install the Electrical Box
The electrical box provides a secure and code-compliant housing for electrical connections.
If no box exists at the chosen location:
- Trace the box outline on the wall.
- Cut the opening carefully using a drywall saw.
- Insert the old-work electrical box.
- Tighten the mounting clamps until secure.
Make sure the box sits flush with the wall surface.
Step 5: Run Electrical Wiring
When the wall sconce is being attached to a wall switch or power source, feed the electric cord through the opening of the wall into the new wall box.
When routing wires:
- Avoid damaging existing plumbing or electrical lines.
- Use fish tape to guide cables through walls.
- Follow local building and electrical codes.
For homeowners unfamiliar with electrical work, consulting a licensed electrician is recommended.
Step 6: Connect the Wiring
Most wall sconces have three wire connections:
- Black wire (hot)
- White wire (neutral)
- Ground wire (green or bare copper)
Match corresponding wires together:
- Black to black
- White to white
- Ground to ground
Secure all connections using approved wire connectors.
Gently tuck the wires into the electrical box after completing the connections.
Step 7: Attach the Mounting Bracket
Most sconces come with a mounting bracket that directly mounts on the electrical box.
Use the provided screws to secure the bracket, and ensure that it is level.
When properly installed, a bracket will keep the fixture steady and aligned.
Step 8: Mount the Wall Sconce
Carefully position the fixture over the mounting bracket.
Install the fixture according to manufacturer’s instructions with the screws or decorative nuts provided.
Do not over tighten as it may damage the fixture or the wall surface.
After mounting, install the recommended light bulb (according to fixture specifications).
Step 9: Restore Power and Test
Go back to the electrical box and turn the circuit breaker to the ON position.
Turn on the wall switch and test the fixture.
Check for:
- Proper illumination
- Secure mounting
- No flickering or unusual sounds
- Even alignment
If the fixture does not operate correctly, turn off power and recheck all wiring connections.
Common Installation Mistakes to Avoid
Incorrect Height Placement
Installing sconces too high or too low can create uneven lighting and disrupt room proportions.
Ignoring Stud Locations
Heavy fixtures require adequate support. Always verify wall structure before installation.
Overcrowding the Space
Wall sconces should match the existing furnishings and decorations, not stand in competition with them. If they are not installed properly, they can cause a cluttered and shadowed appearance.
Skipping Electrical Safety Checks
Never take the power on for checking wiring, always check the power off and always use a voltage tester during the project.
Maintenance Tips
To keep your wall sconces looking and performing their best:
- Dust fixtures regularly
- Clean glass shades with a soft cloth
- Check mounting hardware annually
- Replace bulbs with recommended wattages
- Inspect wiring if flickering occurs
Regular maintenance keeps fixtures working longer and maintains quality of lighting.
Final Thoughts
A wall sconce is a great addition to your home that will add style and utility. With some planning, the right placement, and electrical safety measures, most homeowners can do this project with professional looking results without any problems.
From modernizing a hall to creating a cosy reading nook to lighting up a gorgeous bathroom, wall sconces are a classic lighting fixture that adds beauty and functionality. With this step-by-step guide, you’ll be on your way to a well-lit and well finished area.


- 10 Meters Lamp Post
- 10 Meters Pole
- 1000w Led Projector
- 100W LED Tunnel Light
- 12 Meters Lamp Post
- 12 Meters Pole
- 1200w Led Projector
- 15 Light Pole
- 1500w Led Projector
- 150W LED Tunnel Light
- 1800w Led Projector
- 2 In 1 Solar Flood Light
- 200w Led Tunnel Light
- 50w Led Tunnel Light
- 6 Meters Lamp Post
- 6 Meters Pole
- 8 Meters Lamp Post
- 8 Meters Pole
- 800w Led Projector
- 80w Led Tunnel Light
- Colourful Decorative Light
- Conical post
- Courtyard Lamp
- courtyard light
- courtyard lighting fixture
- Decorative Landscape Light
- Decorative road Light
- Flood Light For Courtyard
- Flood Light for Garden
- Flood Light For Outdoor
- Foot Led High Bay Lights
- high bay led lights 100w
- industrial lampshade
- industrial LED shed lights
- industrial magnifying glass with light
- Integrated Solar Flood Light
- led courtyard lamp
- led courtyard light
- led high bay light 100w
- LED Projector For Stadium
- Led UFO High Bay 150W 5000k
- Lighting Plants Mining Price
- Maintenance Free LED Street Light
- Pic Controlling Tunnel Light
- PLC controlling tunnel light
- Post Top Garden Light
- RGB Landscape Light
- Rgbw Decorative Light
- Smart Tunnel Light
- solar courtyard lamp
- solar courtyard light
- Solar LED Road Light
- Solar Street Light For 10 Meter Pole
- Solar Street Light For 12 Meter Pole
- Solar Street Light For 6 Meter Pole
- Solar Street Light For 8 Meter Pole
- Split Type Solar Flood Light
- Sporting Projector
- Stadium Led Projector
- Street Lighting Post