
 Request A Quote

how to install flood lights
 FACEBOOK
 TWITTER
 LINKEDIN
One of the best improvements to the security, visibility and curb appeal of a home is an outdoor flood light. A flood light can improve a driveway, light up a backyard, or provide additional security around doorways and walkways, and is a quick and easy home improvement task that many can handle in a few hours.
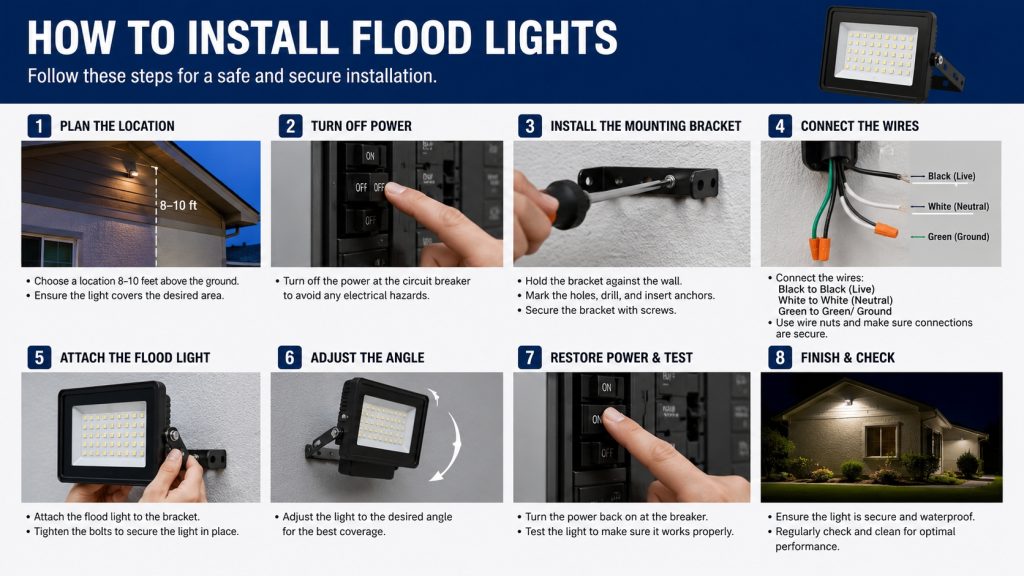
LED floodlights are energy efficient, last longer, and can be smart with features such as motion detection, dusk-to-dawn operation and even remote app controls. Installing a new flood light is an easy task to carry out with the proper tools and preparation, and can help enhance your outdoor lighting system in a single instant.
Install a flood light step by step: This guide will cover the basics of wiring, mounting tips, safety precautions, and common mistakes to avoid when installing a flood light.
Why Install Outdoor Flood Lights?
Exterior spaces are illuminated with floodlights. Flood lights are not meant for decorative purposes like outdoor fixtures, they are meant to provide maximum brightness and coverage.
Flood lights can be installed for the following benefits:
- Improved home security
- Better nighttime visibility
- Enhanced driveway and walkway safety
- Increased curb appeal
- Better outdoor entertainment lighting
- Energy savings with LED technology
Motion activated flood lights are popular choices for homeowners because they only illuminate when someone is moving around, which helps to save electricity and keep intruders at bay.
Choose the Best Location for Your Flood Light
Before starting installation, determine where the light will provide the most benefit.
The following are common places to install flood lights:
- Garage doors
- Front entrances
- Backyard patios
- Side yards
- Driveways
- Walkways
- Storage sheds
- Decks and porches
Mount floodlights so they will reach as far as possible, but not as high as to cause glare. Most fixtures are installed near the roof eaves, soffits or above garage doors. Installation instructions from Home Depot and lighting professionals actually suggest that flood lights should be installed higher to maximize light distribution and security coverage.
It is a lot easier if you are putting up a fixture where one already exists, since the wiring is already there, as is a junction box.
Tools and Materials You Will Need
Gather all tools and supplies before beginning installation.
Basic Tools
- Voltage tester
- Screwdrivers
- Wire strippers
- Electrical tape
- Drill and drill bits
- Ladder
- Pliers
- Utility knife
Materials
- LED flood light fixture
- Outdoor-rated electrical box
- Wire nuts
- Mounting screws
- Silicone caulk
- Electrical cable if adding a new circuit
Select floodlights designed for the outdoors and wet areas. The seals for outdoor fixtures are weather resistant, helping to prevent electrical components from becoming wet or exposed to the elements.
Turn Off Power Before Starting
Don’t work on electrical systems unless it’s safe to do so.
Shut off power from the circuit breaker before working with wires. Use a wall switch only as a last resort. Make sure that there is no power running through the fixture by using a no-contact voltage tester.
According to the electrical installation guides, it is always advisable to test electrical wires before starting the installation work.
When in doubt, call a licensed electrician to handle electrical wiring.
Remove the Existing Fixture
If you are replacing an older outdoor light:
- Remove the light bulbs and fixture cover
- Unscrew the mounting screws
- Carefully pull the fixture away from the wall
- Disconnect the wire connectors
- Separate the black, white, and ground wires
Most existing fixtures use a standard wiring setup:
- Black wire = hot wire
- White wire = neutral wire
- Bare copper or green wire = ground wire
Before disconnecting any wiring, snap a picture of the wiring. This will make it easier to connect the new fixture.
Check the junction box for damage, rust and moisture. If needed, change to outdoor rated boxes that would be exposed to the elements.Change if needed, to weatherproof boxes that would be outside.
Install the Mounting Bracket
Most flood lights come with a mounting bracket or cross bar.
Secure the bracket to the junction box with the included screws. Ensure that it is level and firmly anchored.
Use appropriate anchors and weatherproof mounting hardware when mounting on siding, brick or stucco. Many homeowners do their own work and seal around the mounting surface with silicone sealant to keep water from seeping in.
Stable mounting bracket is important because flood lighting could be heavier than regular outdoor fixtures.
Connect the Wiring
Now it is time to wire the new flood light.
Standard Wiring Connections
Match the wires by color:
- Black to black
- White to white
- Ground to ground
Twist wires together and use wire nuts to hold them in place. Double tape electrical nuts for additional security.
When the wiring is finished, gently insert the wires into the electrical box.
The modern LED flood lights also have clearly marked wires, simplifying the installation process for novices. It is advised by home improvement professionals to inspect all wire connections prior to full installation of the fixture.
Mount the Flood Light Fixture
Position fixture and tighten the mounting screws firmly.
Rotate the flood light heads to target the areas of interest. Do not direct lights into an adjoining neighborhood or windows.
If you have motion sensor flood lights:
- Position sensors away from trees or bushes
- Avoid aiming sensors toward busy streets
- Follow manufacturer recommendations for height and angle
Animals, traffic or moving branches cause false triggers, which can be minimized by proper positioning.
Seal and Weatherproof the Fixture
All outdoor lighting fixings must be kept away from water.
Use exterior grade silicone caulk around the perimeter of the fixture base at the top and sides of the base to the wall. If recommended by the manufacturer, leave the bottom of the container slightly open to drain away moisture.
Weatherproofing helps to prevent fixture failure, short circuits and corrosion over time.
Restore Power and Test the Light
Turn the breaker back on and test the flood light.
Check the following:
- The light turns on properly
- Motion sensors activate correctly
- Light coverage is adequate
- No flickering occurs
- All mounting hardware is secure
Adjust the light angle and sensor sensitivity as needed.
Many LED flood lights also allow customization of:
- Motion detection distance
- Timer duration
- Brightness settings
- Dusk-to-dawn operation
Common Flood Light Installation Mistakes
Avoid these common DIY errors:
Installing Without a Junction Box
Outdoor fixtures should always connect to a proper electrical box. Exposed wiring is unsafe and may violate electrical codes.
Ignoring Weatherproofing
Failing to seal the fixture can lead to moisture damage and electrical issues.
Incorrect Wire Connections
Improper wiring may cause flickering, power loss, or circuit breaker trips.
Poor Placement
Lights aimed too low or too high reduce effectiveness and may create glare.
Overloading Existing Circuits
If adding multiple flood lights, confirm the circuit can safely handle the additional load.
Should You Install Smart Flood Lights?
Smart flood lights are becoming increasingly popular because they offer additional convenience and security.
Features may include:
- Smartphone control
- Voice assistant compatibility
- Motion alerts
- Scheduling
- Camera integration
- Adjustable brightness
Smart LED floodlights can help save energy and provide the homeowner with increased control of outdoor lighting systems.
When to Hire an Electrician
For many projects, replacing an existing flood light can be done by a homeowner; however, there are some instances where professional assistance is needed.
If you have any of these reasons, you should consider calling an electrician:
- You need a new electrical circuit
- No junction box exists
- Wiring appears damaged
- You are uncomfortable working with electricity
- Local codes require licensed installation
Professional installation ensures compliance with electrical codes and improves long-term safety.
Final Thoughts
A flood light is one of the easiest ways to increase home value, security and visibility around the house. New LED technology has resulted in flood lights that are brighter, more efficient and last longer than ever before.
With careful wiring and site selection, and weatherproofing, homeowners can have reliable outdoor lighting for many years.
If you select the correct LED fixture, or even a smart motion activated flood light, you will be able to maximize safety and performance and even improve your outside living area.

- 10 Meters Lamp Post
- 10 Meters Pole
- 1000w Led Projector
- 100W LED Tunnel Light
- 12 Meters Lamp Post
- 12 Meters Pole
- 1200w Led Projector
- 15 Light Pole
- 1500w Led Projector
- 150W LED Tunnel Light
- 1800w Led Projector
- 2 In 1 Solar Flood Light
- 200w Led Tunnel Light
- 50w Led Tunnel Light
- 6 Meters Lamp Post
- 6 Meters Pole
- 8 Meters Lamp Post
- 8 Meters Pole
- 800w Led Projector
- 80w Led Tunnel Light
- Colourful Decorative Light
- Conical post
- Courtyard Lamp
- courtyard light
- courtyard lighting fixture
- Decorative Landscape Light
- Decorative road Light
- Flood Light For Courtyard
- Flood Light for Garden
- Flood Light For Outdoor
- Foot Led High Bay Lights
- high bay led lights 100w
- industrial lampshade
- industrial LED shed lights
- industrial magnifying glass with light
- Integrated Solar Flood Light
- led courtyard lamp
- led courtyard light
- led high bay light 100w
- LED Projector For Stadium
- Led UFO High Bay 150W 5000k
- Lighting Plants Mining Price
- Maintenance Free LED Street Light
- Pic Controlling Tunnel Light
- PLC controlling tunnel light
- Post Top Garden Light
- RGB Landscape Light
- Rgbw Decorative Light
- Smart Tunnel Light
- solar courtyard lamp
- solar courtyard light
- Solar LED Road Light
- Solar Street Light For 10 Meter Pole
- Solar Street Light For 12 Meter Pole
- Solar Street Light For 6 Meter Pole
- Solar Street Light For 8 Meter Pole
- Split Type Solar Flood Light
- Sporting Projector
- Stadium Led Projector
- Street Lighting Post
