how to wire low voltage landscape lighting?
 FACEBOOK
 TWITTER
 LINKEDIN
Landscape lights have the power to turn your house into something special- however what makes the difference in a reliable system is not the lighting but the wiring behind the lighting. New installation or upgrading an old system, installing low voltage landscape lighting properly wired will provide a uniform light output, energy efficiency and durability.
This guide will take you through professional wiring tips every homeowner must know in order to create the professional quality of the outdoor lighting system.
Why Low Voltage Landscape Lighting Is the Smart Choice
Low voltage landscape lighting systems are usually 12 volts and can be installed with less difficulty than normal 120 V systems, and are safer. The power of these systems is reduced by a transformer to minimize the chances of electrical shock, and easier installation.
Moreover, low voltage wiring can be buried with minimal depth and installed without elaborate conduit systems and thus is the best option among DIY homeowners who would want to beautify their outdoors.
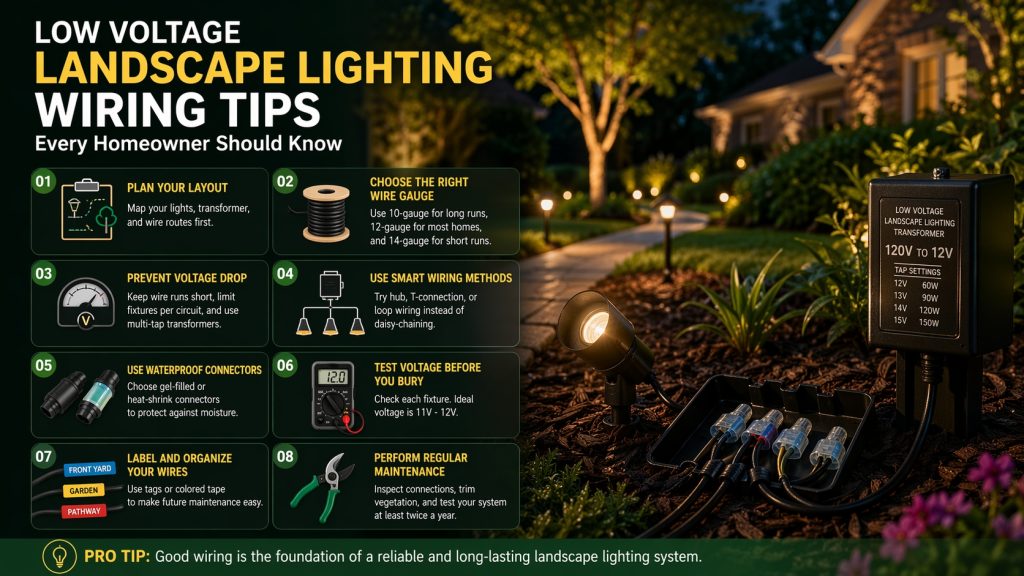
1. Plan Your Lighting Layout Before Installation
Before digging or laying any cables, it’s essential to design your lighting layout.
To begin with the pathways, gardens, patios and architecture are some of the important areas to be identified. Next subdivide your system into areas according to distance and purpose of lighting.
A well-thought-out plan should include:
- Transformer placement near a power source
- Logical grouping of fixtures
- Clear wire routing paths that avoid obstacles
Planning ahead not only improves performance but also makes future maintenance much easier.
2. Choose the Right Wire Gauge for Optimal Performance
One of the most critical aspects of landscape lighting wiring is selecting the correct wire gauge. The thickness of the wire directly affects how efficiently electricity travels through the system.
- 10-gauge wire: Ideal for long distances or high-wattage systems
- 12-gauge wire: Most common for residential use
- 14-gauge wire: Suitable for short runs with fewer fixtures
Thicker wires reduce resistance and minimize voltage drop, ensuring consistent brightness across all fixtures.
Using wires that are too thin can result in dim lights, flickering, and uneven illumination.
3. Avoid Voltage Drop with Smart Wiring Design
Voltage drop is one of the most common problems in low voltage lighting systems. As electricity travels along the wire, some energy is lost—especially over long distances.
This can cause lights farther from the transformer to appear dimmer.
To minimize voltage drop:
- Keep wire runs as short as possible
- Use heavier gauge wires when needed
- Limit the number of fixtures per circuit
- Consider using multi-tap transformers
Proper system design ensures that all fixtures receive consistent voltage and brightness.
4. Use Efficient Wiring Methods (Avoid Daisy-Chaining)
Many DIY installers connect lights in a straight line, known as “daisy-chaining.” While simple, this method often leads to uneven lighting.
Instead, consider these professional wiring techniques:
- Hub (Star) Wiring: All fixtures connect to a central point
- T-Connection Wiring: Splits power into balanced branches
- Loop Wiring: Feeds power from both directions
These methods distribute power more evenly and prevent brightness inconsistencies across your landscape.
5. Always Use Waterproof Connectors
Outdoor wiring is exposed to moisture, dirt, and temperature changes. Using standard connectors can lead to corrosion and system failure over time.
For long-lasting performance:
- Use gel-filled waterproof connectors
- Consider heat-shrink connections
- Avoid leaving exposed copper
Waterproof connections protect your system from environmental damage and ensure reliable operation year-round.
6. Test Voltage Before Final Installation
Before burying your wires, always test your system.
Use a voltmeter to check voltage at each fixture:
- Ideal range: 11V–12V
- Too low: Increase transformer output or adjust wiring
- Too high: Reduce load or rebalance circuits
Testing ensures your system operates efficiently and helps prevent premature bulb failure.
7. Label and Organize Your Wiring
If your system includes multiple zones, labeling wires can save significant time in the future.
Use weather-resistant tags or color-coded tape to identify:
- Front yard lighting
- Garden lights
- Pathway fixtures
Clear labeling simplifies troubleshooting and upgrades, especially as your system expands.
8. Perform Regular Maintenance
Even a well-installed system requires periodic maintenance to stay in top condition.
At least twice a year:
- Inspect connections for corrosion
- Rebury exposed wires
- Trim vegetation around cables
- Test system voltage
Routine maintenance helps prevent unexpected failures and extends the lifespan of your lighting system.
9. Keep Connections Accessible
While wires are typically buried, connections should remain accessible whenever possible.
Use junction boxes or protective enclosures to:
- Protect connections from damage
- Allow easy access for repairs
- Simplify future upgrades
Accessibility is a small detail that can save hours of troubleshooting later.
10. Upgrade Your System for Better Efficiency
If your landscape lighting system is outdated, upgrading your wiring and components can significantly improve performance.
Consider upgrading to:
- LED fixtures for energy efficiency
- Heavy-duty wiring for reduced voltage loss
- Modern transformers with multiple voltage taps
A system upgrade can deliver brighter lighting, lower energy costs, and improved reliability.
Final Thoughts
One of the best methods of illuminating your outside area is low voltage landscape lighting, however, you must be sure the wiring is installed properly.
You can make a beautiful and durable lighting system by planning your layout, selecting the appropriate gauge of wire, waterproof connections, and regular maintenance of your system.
Whether you’re a DIY homeowner or working with a professional, these wiring tips will help you achieve consistent, long-lasting results.
- 10 Meters Lamp Post
- 10 Meters Pole
- 1000w Led Projector
- 100W LED Tunnel Light
- 12 Meters Lamp Post
- 12 Meters Pole
- 1200w Led Projector
- 15 Light Pole
- 1500w Led Projector
- 150W LED Tunnel Light
- 1800w Led Projector
- 2 In 1 Solar Flood Light
- 200w Led Tunnel Light
- 50w Led Tunnel Light
- 6 Meters Lamp Post
- 6 Meters Pole
- 8 Meters Lamp Post
- 8 Meters Pole
- 800w Led Projector
- 80w Led Tunnel Light
- Colourful Decorative Light
- Conical post
- Courtyard Lamp
- courtyard light
- courtyard lighting fixture
- Decorative Landscape Light
- Decorative road Light
- Flood Light For Courtyard
- Flood Light for Garden
- Flood Light For Outdoor
- Foot Led High Bay Lights
- high bay led lights 100w
- industrial lampshade
- industrial LED shed lights
- industrial magnifying glass with light
- Integrated Solar Flood Light
- led courtyard lamp
- led courtyard light
- led high bay light 100w
- LED Projector For Stadium
- Led UFO High Bay 150W 5000k
- Lighting Plants Mining Price
- Maintenance Free LED Street Light
- Pic Controlling Tunnel Light
- PLC controlling tunnel light
- Post Top Garden Light
- RGB Landscape Light
- Rgbw Decorative Light
- Smart Tunnel Light
- solar courtyard lamp
- solar courtyard light
- Solar LED Road Light
- Solar Street Light For 10 Meter Pole
- Solar Street Light For 12 Meter Pole
- Solar Street Light For 6 Meter Pole
- Solar Street Light For 8 Meter Pole
- Split Type Solar Flood Light
- Sporting Projector
- Stadium Led Projector
- Street Lighting Post