how to repair low voltage landscape lighting?
 FACEBOOK
 TWITTER
 LINKEDIN
One of the simplest and most effective methods to make your outdoors space better is with low voltage landscape lighting. It enhances the aesthetic appeal, security and emphasizes such important areas as walkways, gardens and patios. But similar to any outdoor system, these lights may have troubles with the passage of time because of the effects of weather, wiring, or component malfunction.
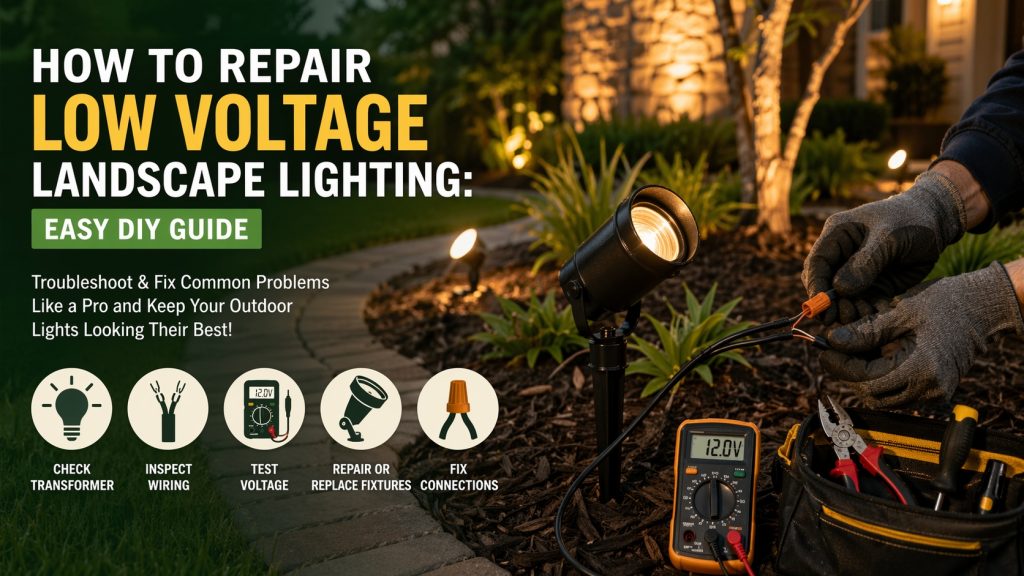
The good news? The majority of landscape lighting repairs of low voltage are easy and not dangerous to do on your own. Step by step in this guide, you will know how to troubleshoot and repair common problems.
What Is Low Voltage Landscape Lighting?
Common Low voltage landscape lighting systems are 12 volts, with a transformer to adjust normal household current (120 V) to a lower, less dangerous voltage.
These systems usually include four main components:
- Transformer (power supply)
- Low voltage wiring
- Light fixtures (bulbs or LEDs)
- Timer or photocell controls
The voltage is also low, which means that the repair is much safer than in the case of traditional electrical system, and thus DIY troubleshooting is a viable solution to homeowners.
Common Problems With Landscape Lighting
Before jumping into repairs, it’s important to identify the issue. Here are the most common problems:
1. Lights Not Turning On
- Power supply failure
- Faulty transformer
- Loose wiring connections
2. Flickering Lights
- Corroded connectors
- Loose cable connections
- Voltage fluctuations
3. Dim Lighting
- Voltage drop over long distances
- Overloaded transformer
- Incorrect wire gauge
4. Some Lights Working, Others Not
- Broken wires underground
- Faulty fixtures
- Poor connections at splice points
Understanding these symptoms will help you diagnose the root cause quickly.
Tools You’ll Need
Before starting repairs, gather these basic tools:
- Screwdriver
- Wire strippers
- Pliers
- Digital voltage meter (multimeter)
- Waterproof wire connectors
- Small shovel (for accessing buried cables)
These tools will allow you to safely inspect and repair most issues.
Step-by-Step Guide to Repair Low Voltage Landscape Lighting
Step 1: Turn Off the Power
Always start by disconnecting power from the transformer. Even though the system is low voltage, this step ensures safety during repairs.
Step 2: Check the Transformer
The transformer is the heart of your lighting system.
- Ensure it’s plugged in and powered
- Check timer or photocell settings
- Inspect internal wiring connections
If the transformer isn’t delivering proper voltage (typically 12–15V), it may need adjustment or replacement.
Step 3: Inspect the Wiring
Wiring issues are one of the most common causes of failure.
- Look for loose or disconnected wires
- Check underground cable splices
- Replace corroded wire connectors
If you find damaged wires:
- Strip about half an inch of insulation
- Twist wires together securely
- Use waterproof connectors to seal the connection
Moisture is a major enemy of outdoor wiring, so always use weatherproof materials.
Step 4: Test Voltage at Fixtures
Use a digital voltage meter to test each light fixture.
- Halogen lights should receive around 10.5–12 volts
- Low readings indicate a wiring or transformer issue
Low voltage often results from poor connections or too many lights on one circuit.
Step 5: Repair or Replace Fixtures
If power is reaching the fixture but it still doesn’t work:
- Replace the bulb with the correct wattage
- Clean corroded contacts
- Check for water damage inside the fixture
If the fixture is severely damaged, replacing it is usually the best solution.
Step 6: Fix Connection Points
Many landscape lighting systems use quick-connect or “piercing” connectors. Over time, these can loosen or corrode.
- Replace faulty connectors with waterproof splice kits
- Ensure tight, secure connections
Poor connections are one of the leading causes of flickering or dead lights.
Advanced Troubleshooting Tips
If your system still isn’t working properly, consider these deeper issues:
1. Transformer Overload
If too many lights are connected, the transformer may struggle to supply enough power.
👉 Solution: Upgrade to a higher-capacity transformer.
2. Voltage Drop
Long cable runs can reduce voltage to distant fixtures.
👉 Solution:
- Use thicker wire (12-gauge instead of 14-gauge)
- Split lights into multiple lines
3. Poor System Design
Improper layout can cause uneven brightness or failures.
👉 Solution:
- Use balanced wiring layouts (T-connections or loops)
- Avoid long single-line “daisy chains”
Maintenance Tips to Prevent Future Issues
Regular maintenance can extend the life of your lighting system:
- Inspect wiring connections every few months
- Clean fixtures and remove dirt buildup
- Replace worn connectors promptly
- Ensure fixtures remain waterproof
Most problems can be avoided with simple routine checks.
When to Call a Professional
While many repairs are DIY-friendly, consider hiring a professional if:
- The transformer repeatedly fails
- Wiring damage is extensive
- You suspect incorrect system design
- You’re unsure about electrical testing
A professional can diagnose complex issues and optimize your lighting system.
Final Thoughts
There is no need to make repair of low voltage landscape lighting complicated. Most problems can be identified and resolved with a systematic approach, as you can begin by working out to the transformer, and then moving outward.
It could be a loose wire, a faulty connector or an old worn out fitting, these systems are easily maintained. Over time with the correct equipment and a little patience you can reregulate your outdoor lighting, and have your landscape looking its best.
- 10 Meters Lamp Post
- 10 Meters Pole
- 1000w Led Projector
- 100W LED Tunnel Light
- 12 Meters Lamp Post
- 12 Meters Pole
- 1200w Led Projector
- 15 Light Pole
- 1500w Led Projector
- 150W LED Tunnel Light
- 1800w Led Projector
- 2 In 1 Solar Flood Light
- 200w Led Tunnel Light
- 50w Led Tunnel Light
- 6 Meters Lamp Post
- 6 Meters Pole
- 8 Meters Lamp Post
- 8 Meters Pole
- 800w Led Projector
- 80w Led Tunnel Light
- Colourful Decorative Light
- Conical post
- Courtyard Lamp
- courtyard light
- courtyard lighting fixture
- Decorative Landscape Light
- Decorative road Light
- Flood Light For Courtyard
- Flood Light for Garden
- Flood Light For Outdoor
- Foot Led High Bay Lights
- high bay led lights 100w
- industrial lampshade
- industrial LED shed lights
- industrial magnifying glass with light
- Integrated Solar Flood Light
- led courtyard lamp
- led courtyard light
- led high bay light 100w
- LED Projector For Stadium
- Led UFO High Bay 150W 5000k
- Lighting Plants Mining Price
- Maintenance Free LED Street Light
- Pic Controlling Tunnel Light
- PLC controlling tunnel light
- Post Top Garden Light
- RGB Landscape Light
- Rgbw Decorative Light
- Smart Tunnel Light
- solar courtyard lamp
- solar courtyard light
- Solar LED Road Light
- Solar Street Light For 10 Meter Pole
- Solar Street Light For 12 Meter Pole
- Solar Street Light For 6 Meter Pole
- Solar Street Light For 8 Meter Pole
- Split Type Solar Flood Light
- Sporting Projector
- Stadium Led Projector
- Street Lighting Post